MedStrato User Manual
This product document describes every major screen, control, and setting in MedStrato. It is organized to match the product flow: discover opportunities and policy signals, decide which opportunities to pursue, create and run tenders from document parse through to Tender Package export, and capture post-bid outcomes for learning. Each section includes direct links to the app so you can open the relevant screen and follow along. In this guide:- Introduction — What MedStrato is, main modules, and how to use this document
- Chapter 1: Dashboard — KPIs, filters, and Tender Conversion Funnel (with screenshot references)
- Chapter 2: Opportunities — List, detail panel, Map, Analytics, and Decisions
- Chapter 3: Policy — Global Policy Signals and Investigations
- Chapter 4: Tenders — Tender list, New Tender form, parse, Technical editor, Commercial editor, Tender Package
- Chapter 5: Post-bid evaluation — Stage (Move to) and Bid Debrief
- Appendix — Navigation, prerequisites, quick links, and screenshot index
Introduction
MedStrato is an AI-assisted platform for finding opportunities, managing tenders, and tracking regulatory policy. You use it to discover relevant opportunities, decide which to pursue, create and submit bids, and learn from outcomes. This document explains each area of the product and every button, filter, and setting you will see on screen. Open MedStrato: https://app.medstrato.comMain modules (sidebar)
The left sidebar groups the product into four areas. Use these to move between Dashboard, opportunity discovery, policy monitoring, tender management, and tools.| Section | Modules | Purpose |
|---|---|---|
| FIND | Opportunities, Policy | Market monitoring (opportunities list, map, analytics, decisions) and regulatory/policy signals |
| WIN | Tenders, Experts | Full bid lifecycle (list, new tender, parse, technical/commercial editors, Tender Package) and expert resources |
| GROW | Campaigns, Regulatory | Outreach campaigns and compliance/regulatory tracking |
| Tools | Events, Press, Products, Institutions, Settings | Events, press, product catalog, institutions, and app settings |
How to use this document
- Bold labels in this document (e.g. New Tender, Create Bid, Run Autopilot) match the exact text in the MedStrato UI. Use them to locate the control on screen.
- Each chapter starts with a link to the corresponding area in the app. Open that link and follow the steps on the actual screen.
- For the best experience with AI features (e.g. Analyze on opportunities, AI Signal Analysis on policy, Tender Intel, pricing insights), configure your Company profile and Products in Settings. Without them, some analyses are unavailable or show “Data insufficient.”
- Screenshots: All figures are under
images/user-manual/and are embedded in this manual. The Screenshot index lists every image and its section.
Chapter 1: Dashboard
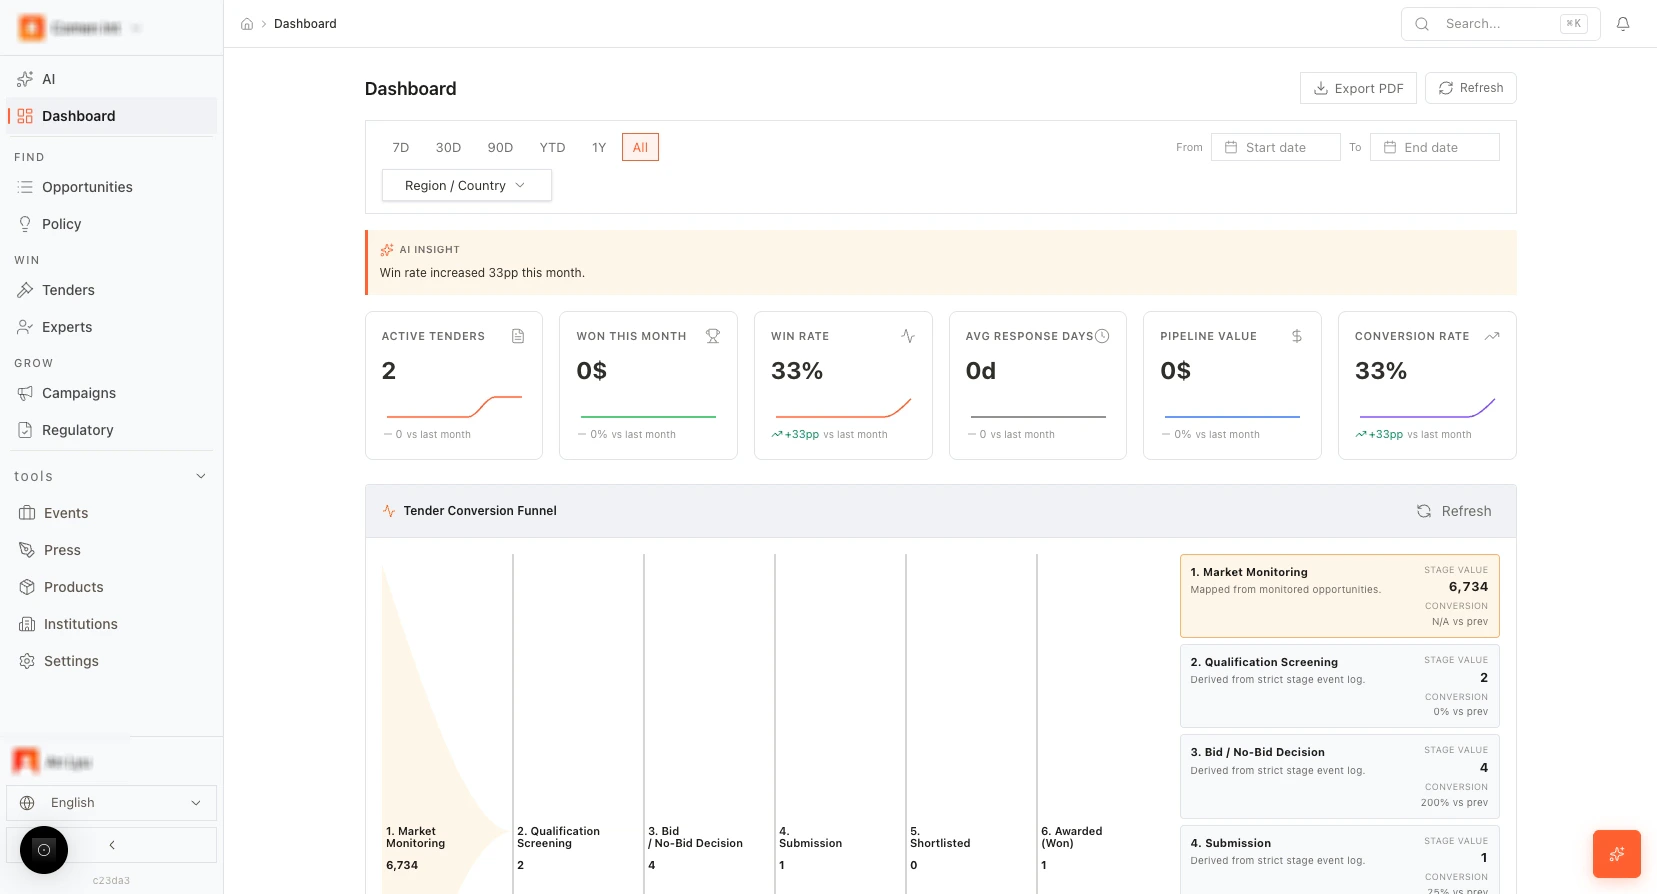
The Dashboard gives managers a single view of pipeline and performance: key metrics (KPIs), time and region filters, and the Tender Conversion Funnel. All data can be scoped by date range and by region or country. Open the Dashboard: https://app.medstrato.com/dashboard Screenshot reference: 2-DASHBOARD — Dashboard overview (KPIs, funnel, filters); Top filters (time, date range, Region/Country open).Page layout
- Left navigation: AI and Dashboard. Dashboard is the current page. The breadcrumb in the header shows Home > Dashboard.
- Header (top bar): Page title “Dashboard,” global Search (with shortcut hint, e.g. *K), Notifications (bell icon), and user profile / account menu.
- Main content area: Below the header you see the dashboard controls, then the KPI row, then the Tender Conversion Funnel and its detail panel.
Dashboard controls and filters
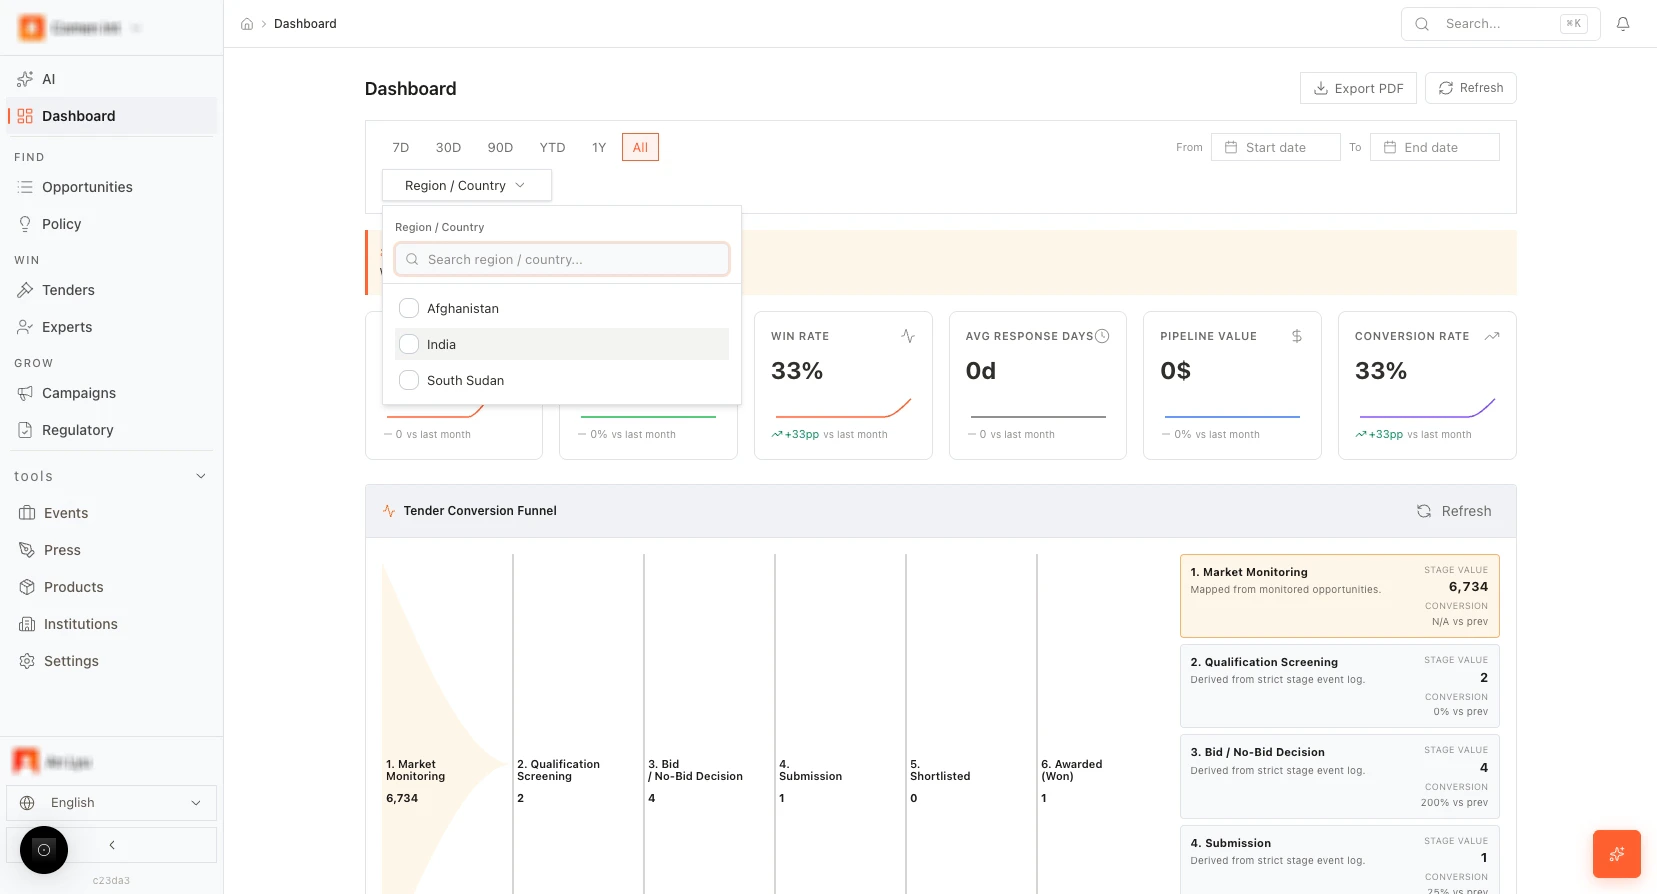
Use these to change what data the Dashboard shows.- Time period buttons: 7D, 30D, 90D, YTD, 1Y, All. Click one to limit the view to that period. All shows the full history.
- Custom date range: From and To fields with date pickers let you set a custom range (e.g. “Start date” and “End date”). Use these when the preset periods are not enough.
- Region / Country: A dropdown labeled Region / Country lets you filter by geography. When you open it, you get a search box (“Search region / country…”) and a list of countries/regions with checkboxes. Select one or more; the KPIs and funnel update to only include data for the selected locations.
- Export PDF: Exports the current dashboard view (KPIs and funnel) as a PDF.
- Refresh: Reloads the dashboard data from the server.
AI Insight banner
An orange banner with an “AI INSIGHT” label may appear above the KPIs. It shows a short, data-driven insight (e.g. “Win rate increased 33pp this month”). The content is generated from your pipeline and outcome data.KPI cards (six metrics)
Six cards in a row show the main performance metrics. Each card has a value, a small trend line (sparkline), and a comparison to the previous period (e.g. “vs last month”).| Card | Meaning | Example comparison text |
|---|---|---|
| Active Tenders | Number of tenders currently in progress (e.g. in Lead, Evaluating, Preparing, Quoting, Submitted, Pending Result) | “-0 vs last month” |
| Won This Month | Value or count of tenders marked Won in the current month | “-0% vs last month” |
| Win Rate | Percentage of decided tenders (Won + Lost) that were Won | “+33pp vs last month” |
| Avg Response Days | Average number of days from opportunity or tender creation to first substantial response | “-0 vs last month” |
| Pipeline Value | Total estimated value of tenders still in progress | “-0% vs last month” |
| Conversion Rate | Conversion from an earlier stage to a later stage (definition may depend on your funnel setup) | “+33pp vs last month” |
Tender Conversion Funnel
Below the KPIs, the Tender Conversion Funnel shows six stages in a horizontal funnel. Each stage is a block with a count. The funnel narrows from left to right as opportunities move from monitoring into qualification, bid decision, submission, shortlist, and award.- Market Monitoring — Count of opportunities from monitored sources. Description: “Mapped from monitored opportunities.” This stage is fed by your Opportunities data.
- Qualification Screening — Count after qualification. Description: “Derived from strict stage event log.”
- Bid / No-Bid Decision — Count at bid/no-bid decision. Description: “Derived from strict stage event log.”
- Submission — Count submitted. Description: “Derived from strict stage event log.”
- Shortlisted — Count shortlisted. Description: “Derived from strict stage event log.”
- Awarded (Won) — Count won. Description: “Derived from strict stage event log.”
Step-by-step: View Dashboard by time and region
- Open the Dashboard.
- Click a time period (7D, 30D, 90D, YTD, 1Y, or All) to scope the KPIs and funnel.
- (Optional) Set a custom range with From and To.
- Open Region / Country, search or select one or more countries/regions, and close the dropdown. The page updates to show only data for that geography.
- Click Refresh if you want to reload data; use Export PDF to download the current view.
Chapter 2: Opportunities (Find bids)
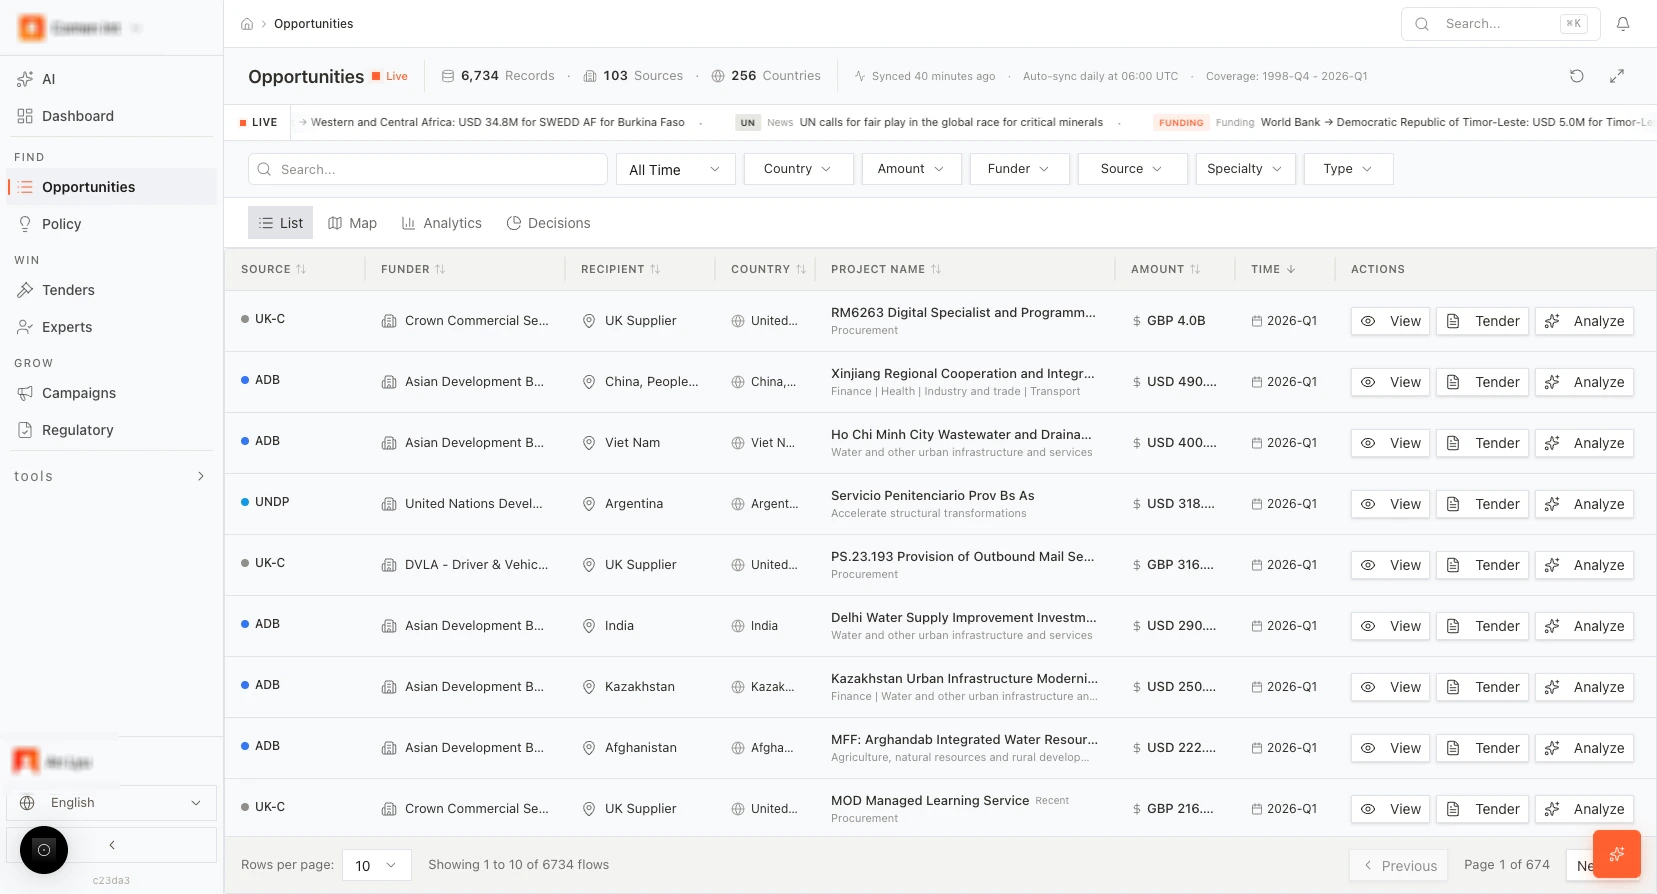
Opportunities is where you discover, filter, and evaluate market opportunities before turning them into tenders. You work in four views: List, Map, Analytics, and Decisions. This chapter describes every element on each view and how to use Create Bid and Analyze from the opportunity detail panel. Open Opportunities (list): https://app.medstrato.com/opportunities?view=list Screenshot reference: 3-OPPO — Opportunities list (01-a1), list with filters (01-a2), opportunity detail panel (01-b1, 01-b2), Map (02), Analytics (03), Decisions (04).List view — header and data status
At the top of the Opportunities page you see:- Page title: “Opportunities.”
- Live indicator: A “Live” badge or label indicating the data is from the live system.
- Record count: Total number of opportunity records (e.g. “6,734 records”).
- Sources and countries: Summary of data sources and countries covered.
- Sync time: When the data was last synced (e.g. “Synced 40 minutes ago”).
- Auto-sync schedule: When the next sync runs (e.g. “Auto-sync daily at 06:00 UTC”).
- News ticker: A ticker or banner showing recent highlights (e.g. new opportunities or alerts).
List view — tabs and table
- Tabs: List (active by default), Map, Analytics, Decisions. Click a tab to switch views.
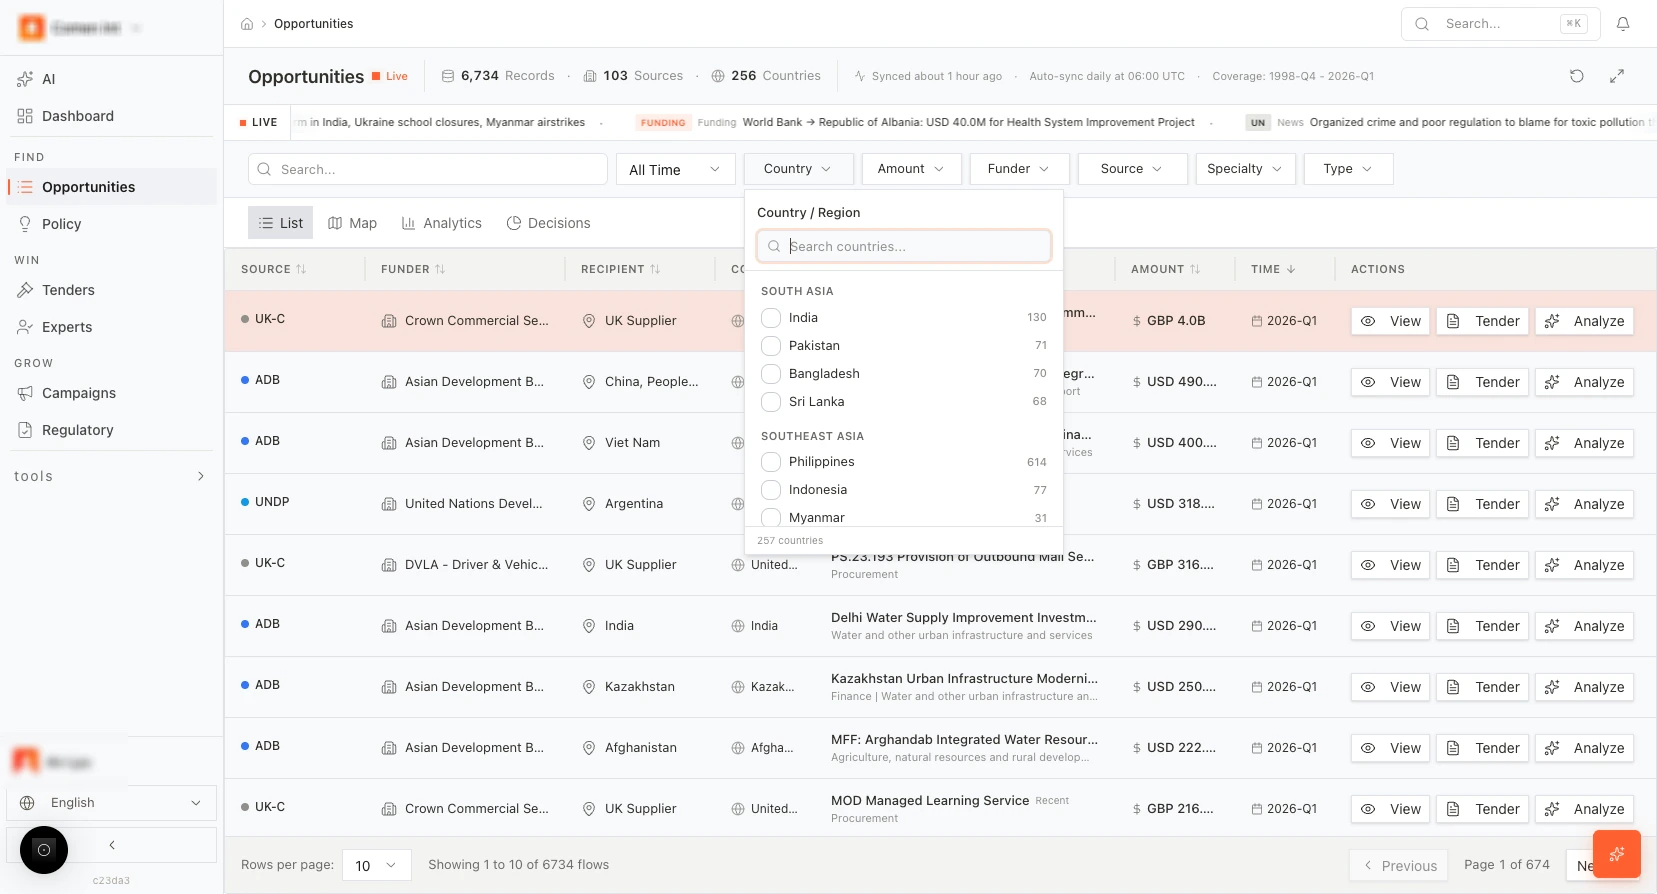
- Search bar: Type to search across opportunity fields (e.g. project name, funder, country).
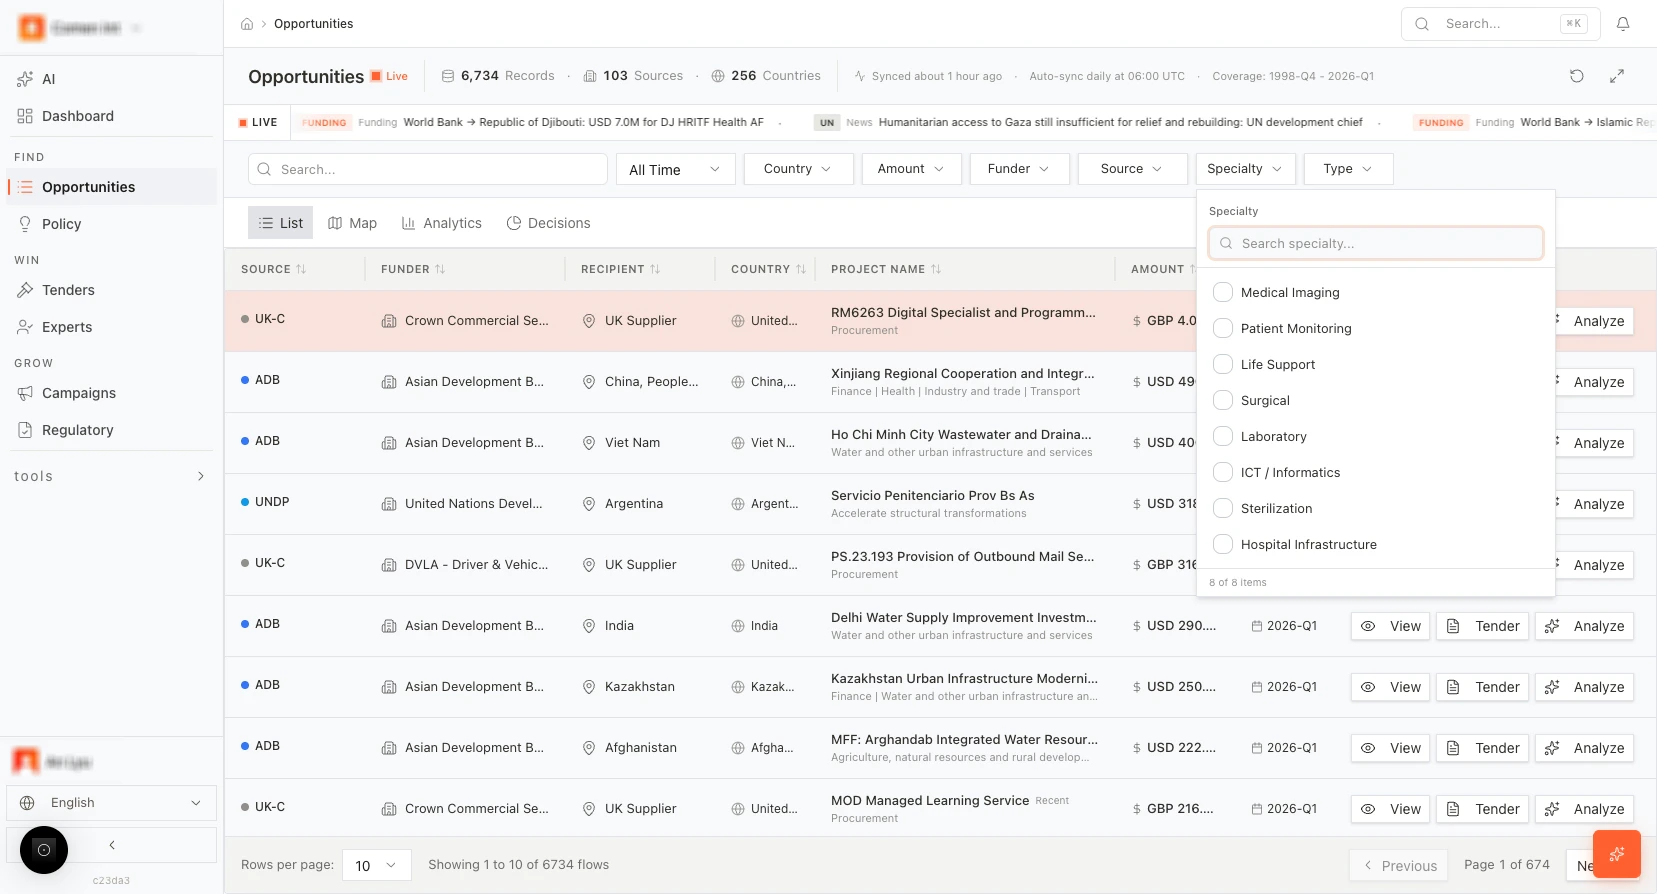
- Filters: Use the filter bar to narrow the list. Typical filters include:
- All Time (or a time range)
- Country (multi-select)
- Amount (min/max or range)
- Funder
- Source
- Specialty (useful for MedTech)
- Type Apply one or more filters; the table updates and the record count reflects the filtered set.
- Table columns: The main table shows at least: SOURCE, FUNDER, RECIPIENT, COUNTRY, PROJECT NAME, AMOUNT, TIME, and ACTIONS. In ACTIONS you get View, Tender (or Create Bid), and Analyze.
- Pagination: At the bottom, set rows per page (e.g. 10, 25, 50) and use Previous/Next or page numbers to move through the list.
Opportunity detail panel (right-hand side)
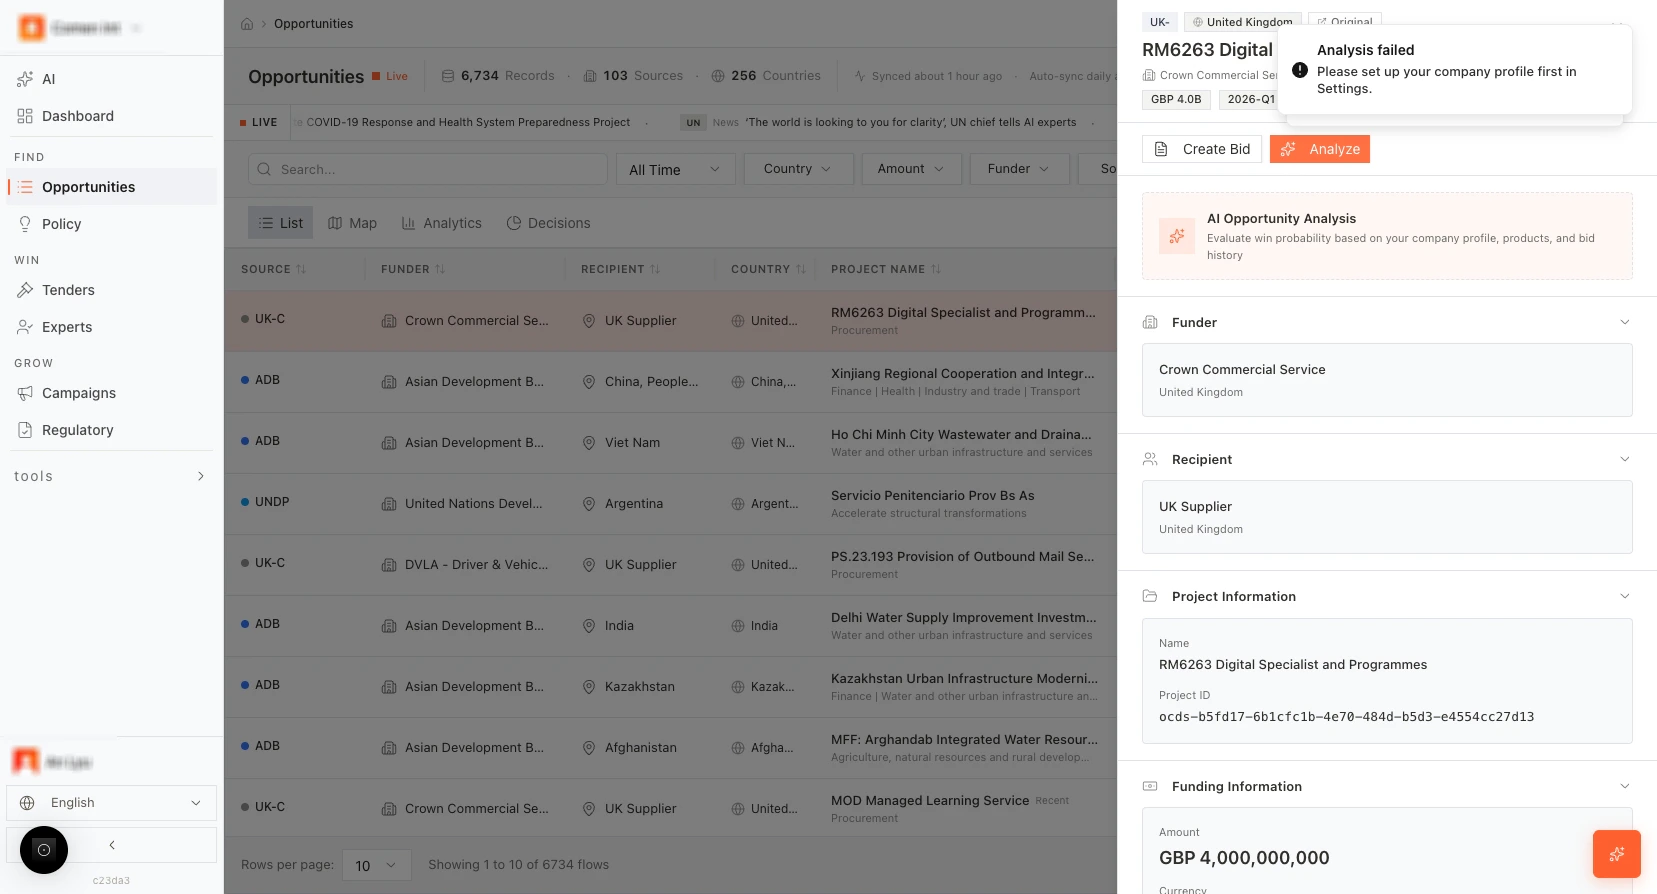
When you click a row or View, a detail panel opens on the right. It shows the full opportunity record and the main actions. Summary area:- Project name, tags, amount, time window, and status.
- Short description or summary if available.
- Create Bid — Starts a new tender with this opportunity’s information pre-filled (name, reference, country, funder, etc.). Use this when you have decided to bid.
- Analyze — Runs AI opportunity analysis. The system uses your company profile, products, and bid history to estimate win probability and fit. The result is shown in the panel or in a modal.
- Funder — Funder name and details.
- Recipient — Recipient or beneficiary information.
- Project info — Project name, description, type, and related metadata.
- Funding — Amount, currency, and funding details.

Map view
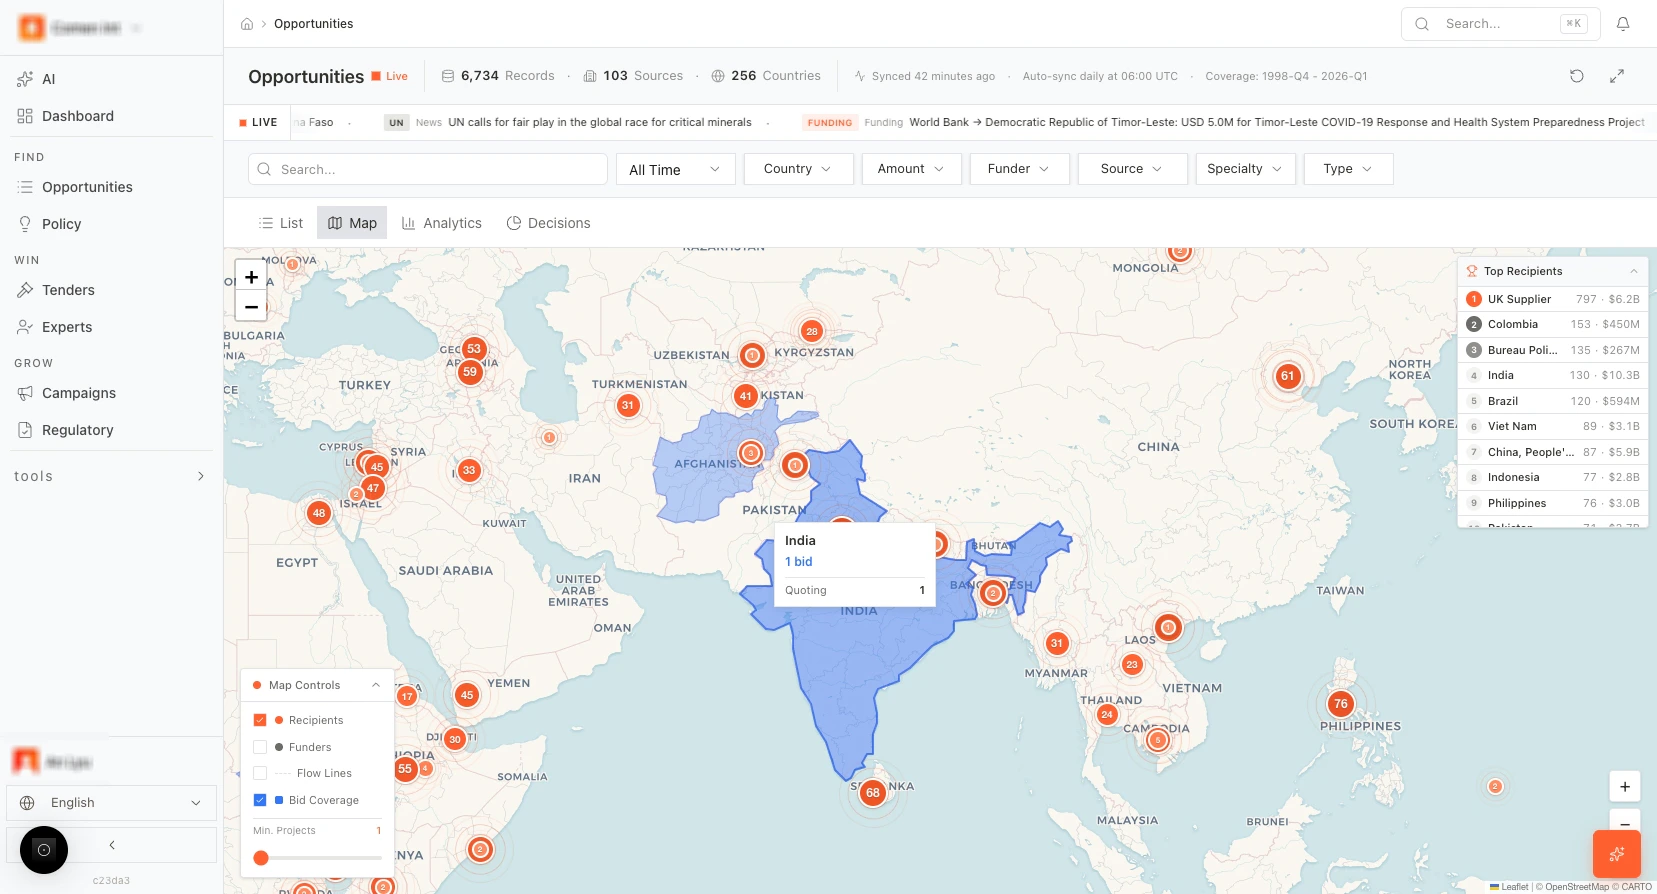
Switch to the Map tab to see opportunities by geography.- Map: World (or regional) map with:
- Orange points — Opportunity locations (e.g. by country or city).
- Blue areas — Countries or regions where you already have bids (bid coverage). This helps you see overlap between opportunities and existing bid activity.
- Map controls (legend / toggles): You can turn on or off:
- Recipients
- Funders
- Flow lines (e.g. funder-to-recipient flows)
- Bid coverage And use a Min. projects slider to show only regions with at least N projects.
- Tooltips: Hover over a country or point to see a tooltip (e.g. count of opportunities and a stage like “Quoting”).
- Top Recipients panel: A side or bottom panel lists top recipients with counts and total value. Use it to see which recipients have the most opportunities.
Analytics view
The Analytics tab shows a funnel chart (or similar visualization) of your opportunity pipeline. You can see how many opportunities move from one stage to the next and where drop-off or bottlenecks occur. Use it for pipeline health and conversion analysis.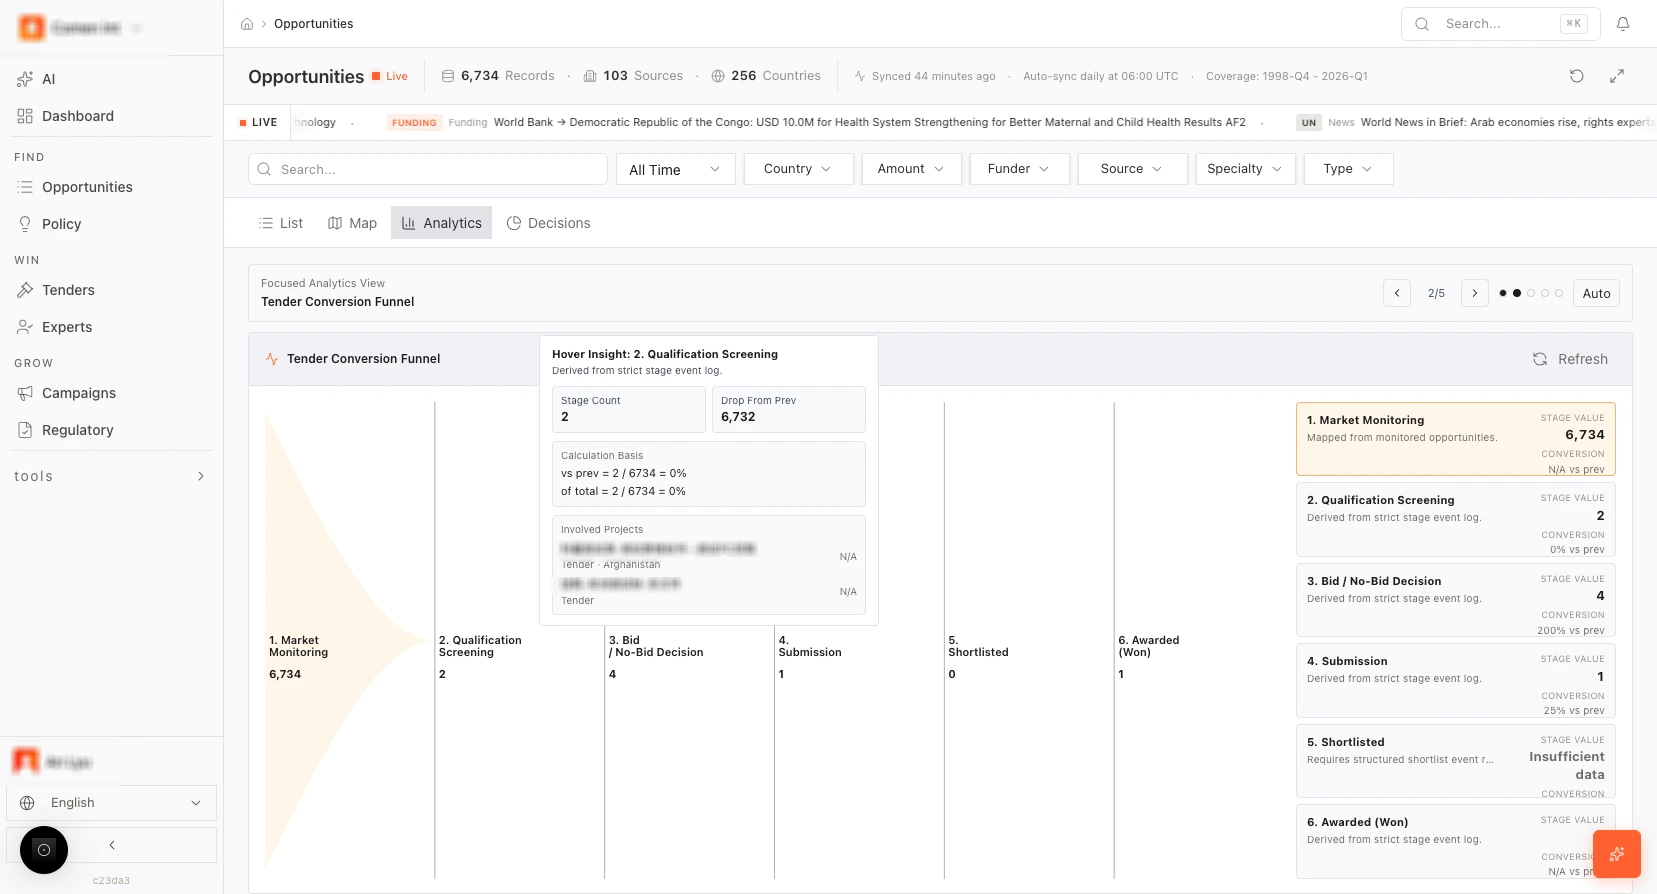
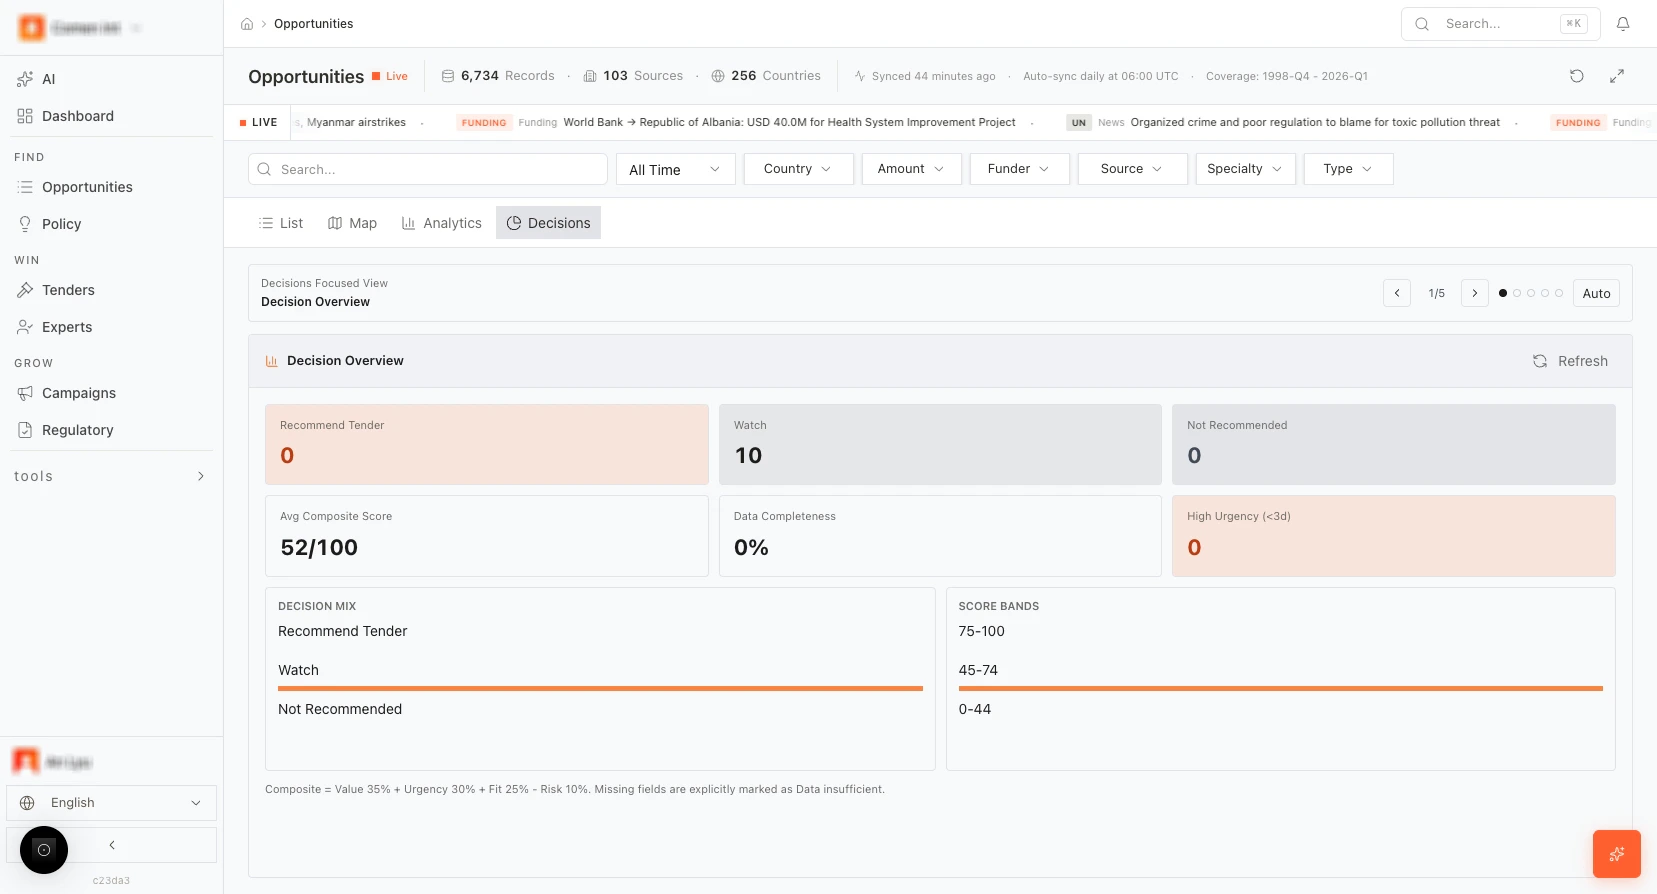
Decisions view
The Decisions tab helps you decide which opportunities to pursue. It summarizes recommendation outcomes and composite scores.- Counts: Recommend Tender, Watch, and Not Recommended — how many opportunities fall into each bucket.
- Metrics: Avg Composite Score (e.g. 52/100), Data completeness (e.g. % of records with enough data for scoring), High urgency (<3d) (count of opportunities with deadline in under 3 days).
- Decision mix: A bar chart (or similar) showing the mix of Recommend / Watch / Not recommended.
- Score bands: The bands used for recommendations, e.g.:
- 75–100: Recommend Tender
- 45–74: Watch
- 0–44: Not Recommended
- Composite Score formula: Value 35% + Urgency 30% + Fit 25% − Risk 10%. If data is missing for an opportunity, it may be marked “Data insufficient” and excluded from the score.
Step-by-step: Create a bid from an opportunity
- Open Opportunities (list).
- Use Country, Amount, Funder, Source, or Specialty to narrow the list. Optionally use the search bar.
- Click a row (or View in ACTIONS) to open the detail panel on the right.
- (Optional) Click Analyze to see AI win-probability and fit. Ensure Company profile and Products are set in Settings so Analyze runs.
- Click Create Bid. A new tender is created with the opportunity’s name, country, funder, and other details pre-filled.
- You are taken to the new tender; complete New Tender fields if needed, then upload documents and continue in Tech → Commercial → Package as in Chapter 4.
Chapter 3: Policy
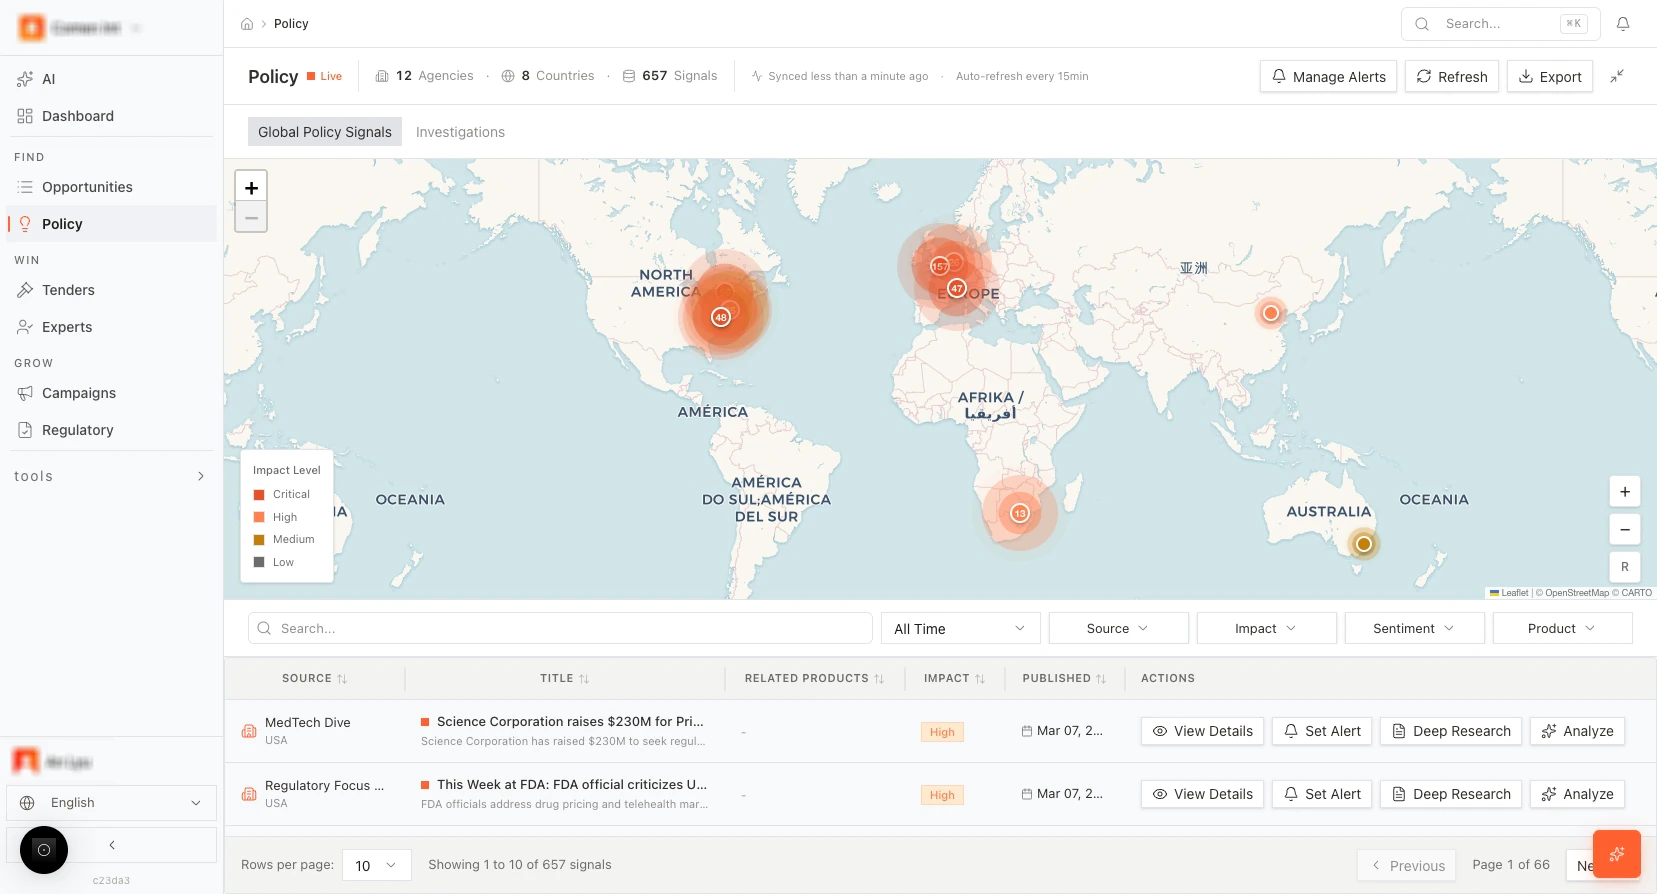
The Policy module tracks global regulatory and policy signals and lets you run deeper Investigations. Use it to monitor impact by region and to analyze how signals affect your business. This section describes the Policy page layout, the signals table and map, the signal detail panel (including Ask AI, Deep Analyze, Create Alert), and the Investigations tab. Open Policy: https://app.medstrato.com/policy Screenshot reference: 4-POLICY — Policy overview (Global Policy Signals list and map); signal detail panel (Ask AI, Deep Analyze, Create Alert).Policy page — header and tabs
- Page title: “Policy.”
- Live indicator: Indicates data is from the live system.
- Summary stats: Agency count, countries covered, total signal count.
- Sync time and auto-refresh: When data was last synced and how often it refreshes (e.g. every 15 min).
- Tabs: Global Policy Signals (active by default), Investigations. Click Investigations to switch to the investigations workspace.
Global Policy Signals — map and impact legend
- Map: A world or regional map shows signal density or impact by geography. Colors or shading indicate where signals are concentrated and their severity.
- Impact legend: Critical, High, Medium, Low. Use the legend to interpret map colors and to filter the list by impact level.
Global Policy Signals — table and filters
- Table columns: SOURCE, TITLE, RELATED PRODUCTS, IMPACT, PUBLISHED (date). Each row is one policy or regulatory signal.
- Row actions: View (open detail panel), Set Alert (create an alert for similar signals), Deep Research (start or open a deep research flow), Analyze (run AI analysis for this signal).
- Search and filters: All Time, Source, Impact, Sentiment, Product. Use these to narrow the list. Pagination at the bottom lets you move through pages.
Signal detail panel (right-hand side)
When you click a row or View, the signal detail panel opens on the right. Summary:- Title — Signal or article title.
- Impact — Critical / High / Medium / Low.
- Sentiment — If available (e.g. positive, negative, neutral).
- Published — Publication or release date.
- Impact score — Some signals show a numeric score (e.g. 75/100).
- Categories — e.g. Regulatory, Clinical, Market.
- Summary and key points — Short text summary and bullet points.
- Ask AI — Open a chat or query box to ask the AI questions about this signal (e.g. “How does this affect our product X?”).
- Deep Analyze — Run AI-driven impact analysis. The system uses your company profile and products to assess business impact.
- Create Alert — Set an alert so you are notified when similar or related signals appear.
- View Original — Open the source document or article in a new tab.
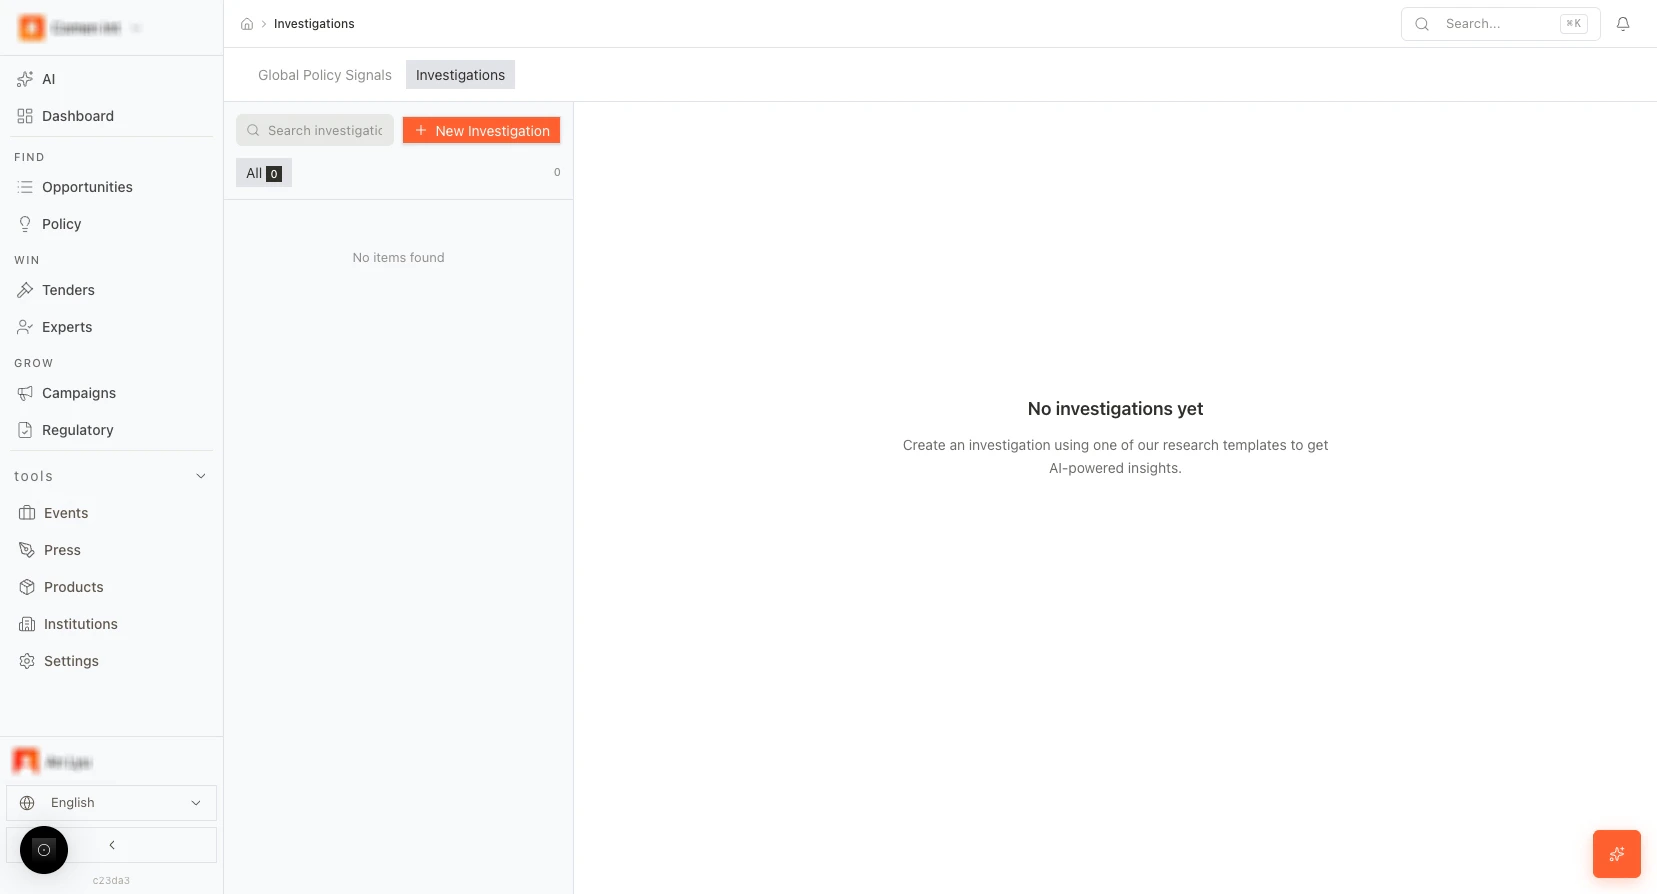
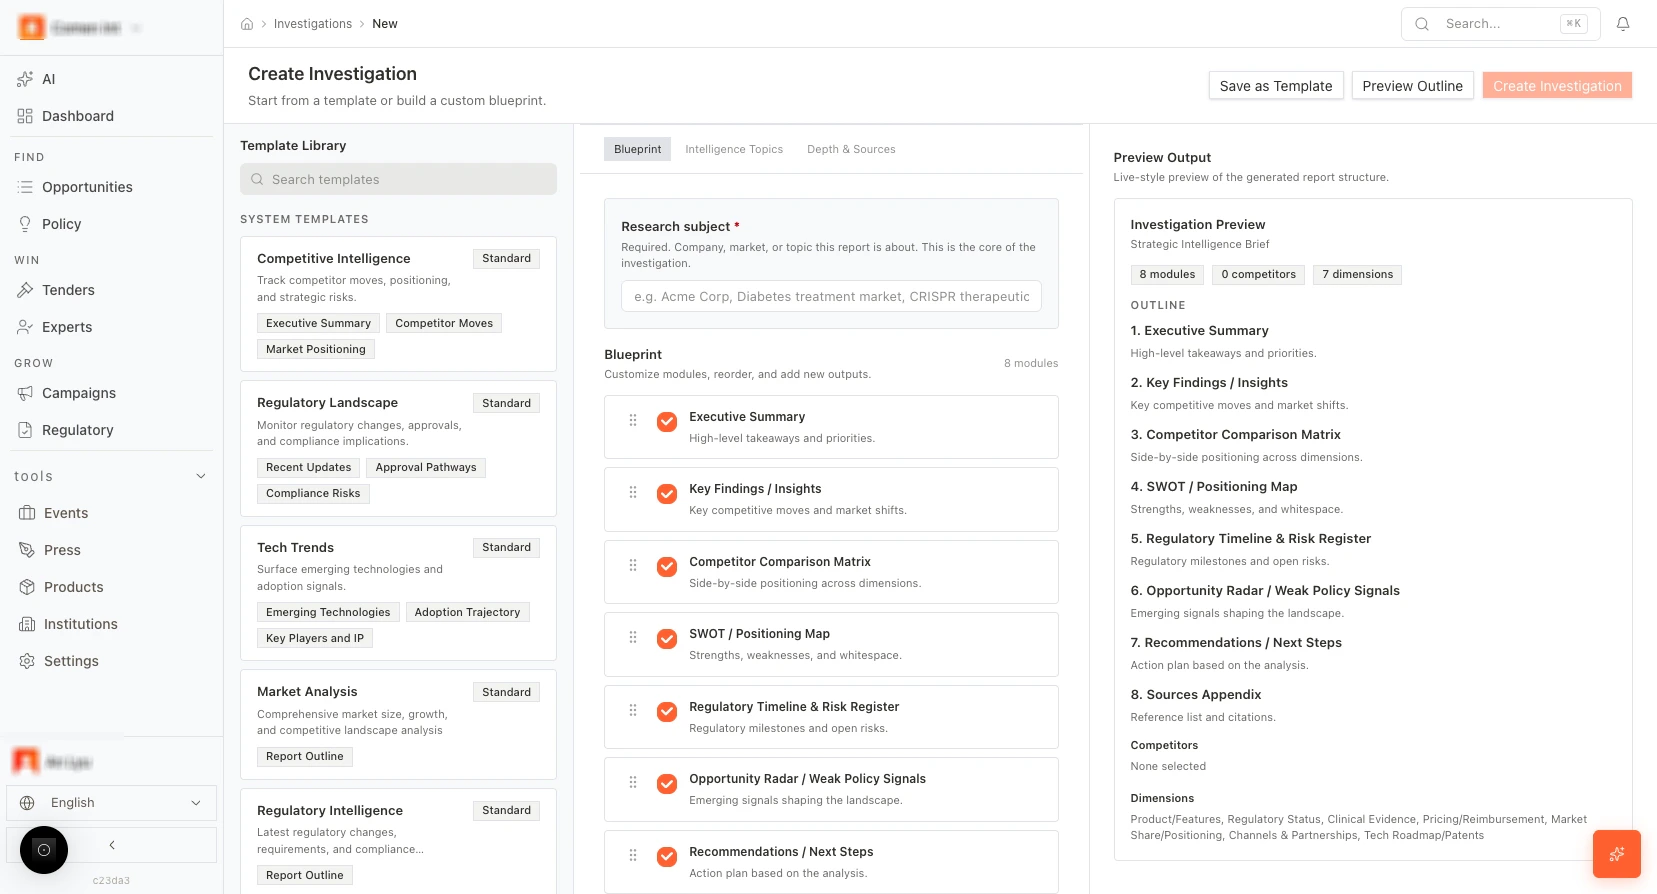
Investigations tab
Switch to Investigations for deeper, structured research.- New Investigation — Start a new investigation. You may be able to choose a template (e.g. regulatory change, market trend).
- Search — Find existing investigations by name or keyword.
- Investigation settings: Inside an investigation, you can configure conditions, scope, and data sources (e.g. Investigation settings) for AI-powered deep research. The system then runs structured analysis and surfaces insights.
Step-by-step: Analyze a policy signal and create an alert
- Open Policy.
- Use Impact, Source, Sentiment, or Product to filter the list. Click a row or View to open the signal detail panel.
- In the panel, read Title, Impact, Summary and key points. Optionally click View Original to open the source.
- Click Ask AI and type a question (e.g. “How does this affect our product X?”). Review the answer.
- Click Deep Analyze to run AI impact analysis (best when Company profile and Products are set in Settings).
- Click Create Alert to be notified when similar or related signals appear. Complete the alert settings and save.

Chapter 4: Tenders (Create and run bids)
Tenders is where you manage the full bid lifecycle: create tenders, upload and parse documents, complete technical and commercial responses, and generate the Tender Package. Bid Autopilot can run much of this flow in one click. This chapter describes the tender list, New Tender form (every field), document upload and parse, the Technical editor (all tools), the Commercial (quotation) editor, and the Tender Package (sections, AI generate, rewrite, export, finalize). Open Tenders: https://app.medstrato.com/tenders Screenshot reference: 5-1-TENDERS — Tender list and stage tabs; New Tender form; upload/parse; Technical editor; Commercial editor; Tender Package (sections, generate, AI edit, export, finalize).Tender list — header and navigation
- Deadlines: A widget or banner shows upcoming submission deadlines (e.g. “0 upcoming” when none). Use it to prioritize tenders by due date.
- Search Tenders… — Search box to find tenders by name, reference, or keyword.
- New Tender — Button or link to create a new tender. Opens the New Tender form or https://app.medstrato.com/bids/new.
- Stage tabs: All, Lead, Evaluating, Preparing (and possibly Quoting, Submitted, Pending Result, Won, Lost, Cancelled). Each tab shows a count. Click a tab to filter the list by stage.
- Sort: Sort the list by Stage, A–Z, or Deadline (and possibly other options).
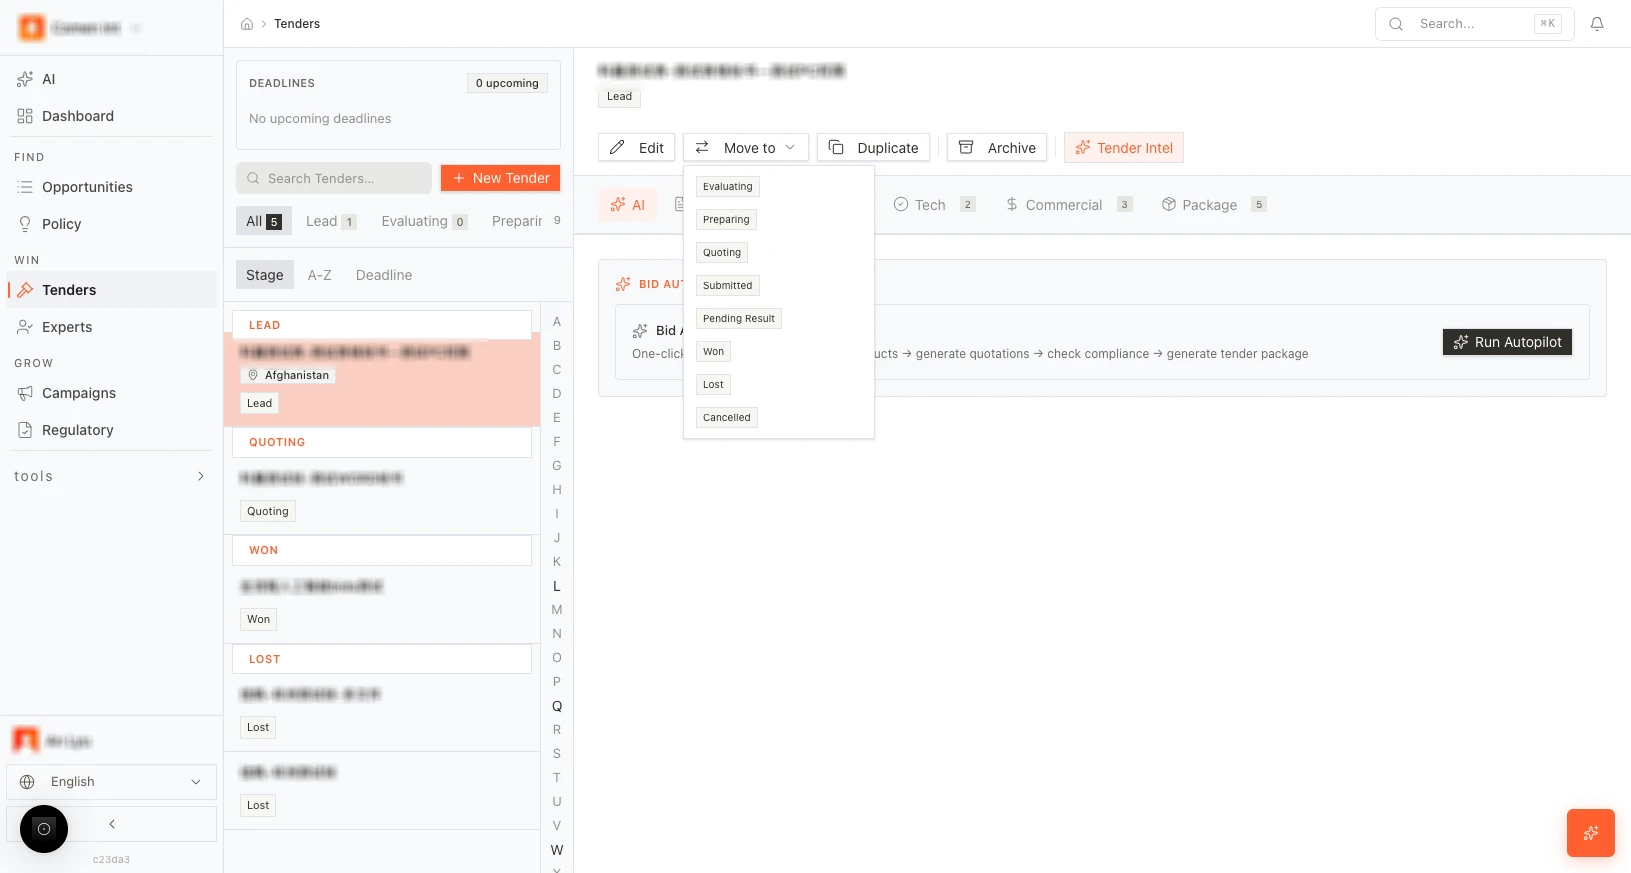
Tender list — per-tender actions and tabs
For each tender in the list (or when a tender is selected):- Edit — Open the tender for editing (overview, basic info).
- Move to — Change the tender stage (e.g. Evaluating, Preparing, Quoting, Submitted, Pending Result, Won, Lost, Cancelled).
- Duplicate — Create a copy of the tender.
- Archive — Archive the tender so it no longer appears in the active list.
- Tender Intel — Open the Tender Intel assistant to ask questions about this tender (requirements, compliance, strategy).
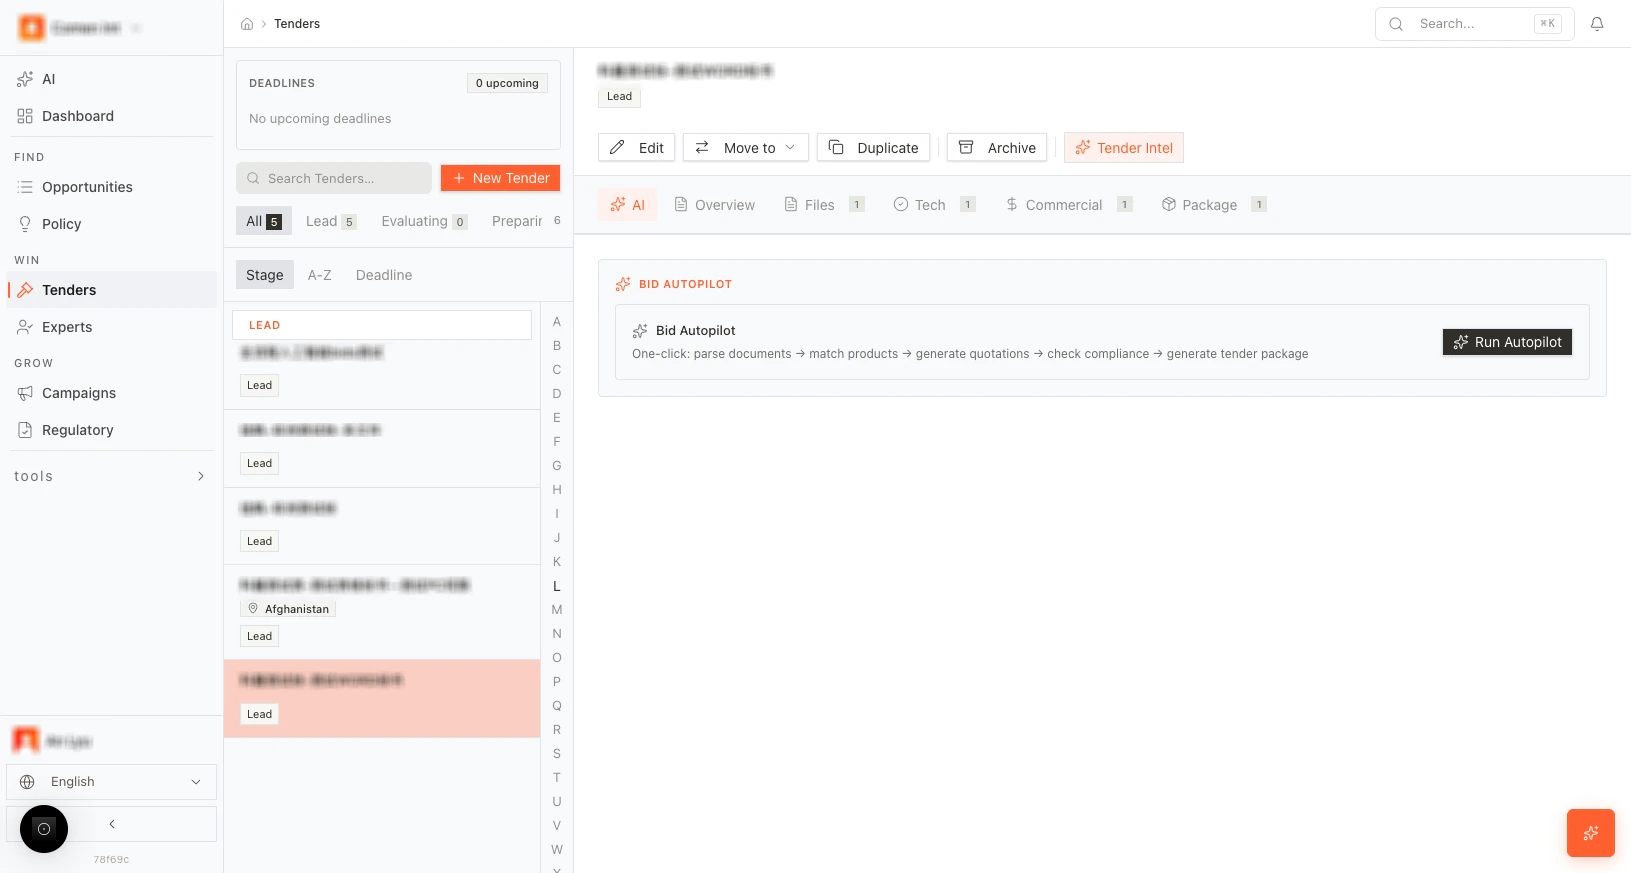
Bid Autopilot
Bid Autopilot automates the flow: parse documents → match products → generate quotations → check compliance → generate tender package. Use Run Autopilot (or the equivalent button) to start it. The system runs the steps in sequence; you can then review and adjust in the Technical editor, Commercial editor, and Tender Package as needed.Creating a new tender — form fields
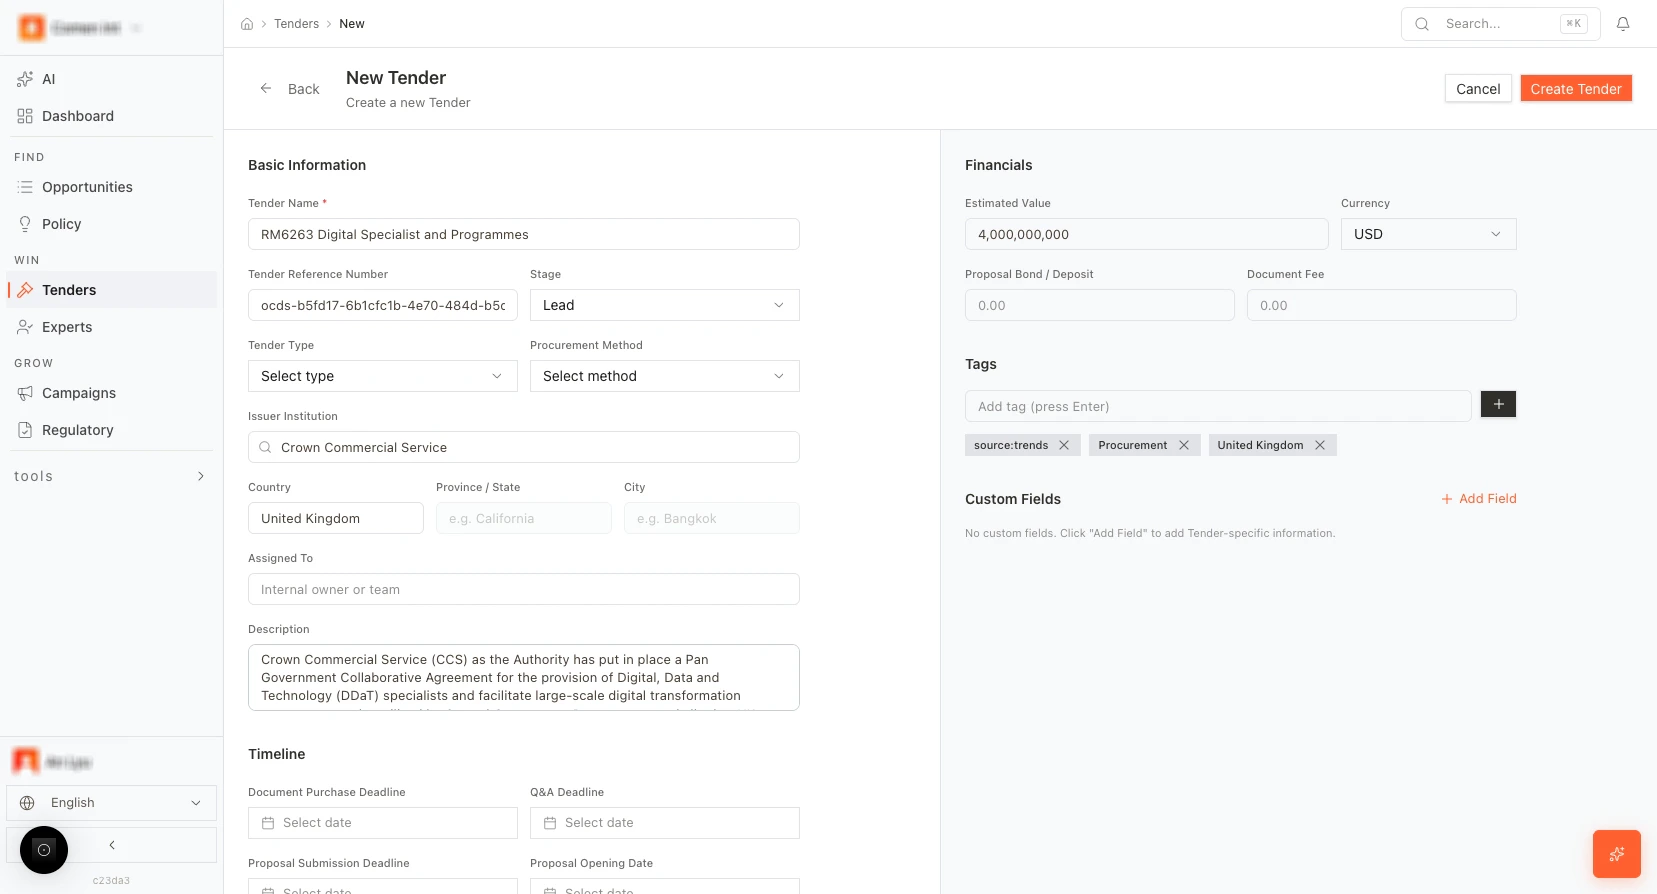
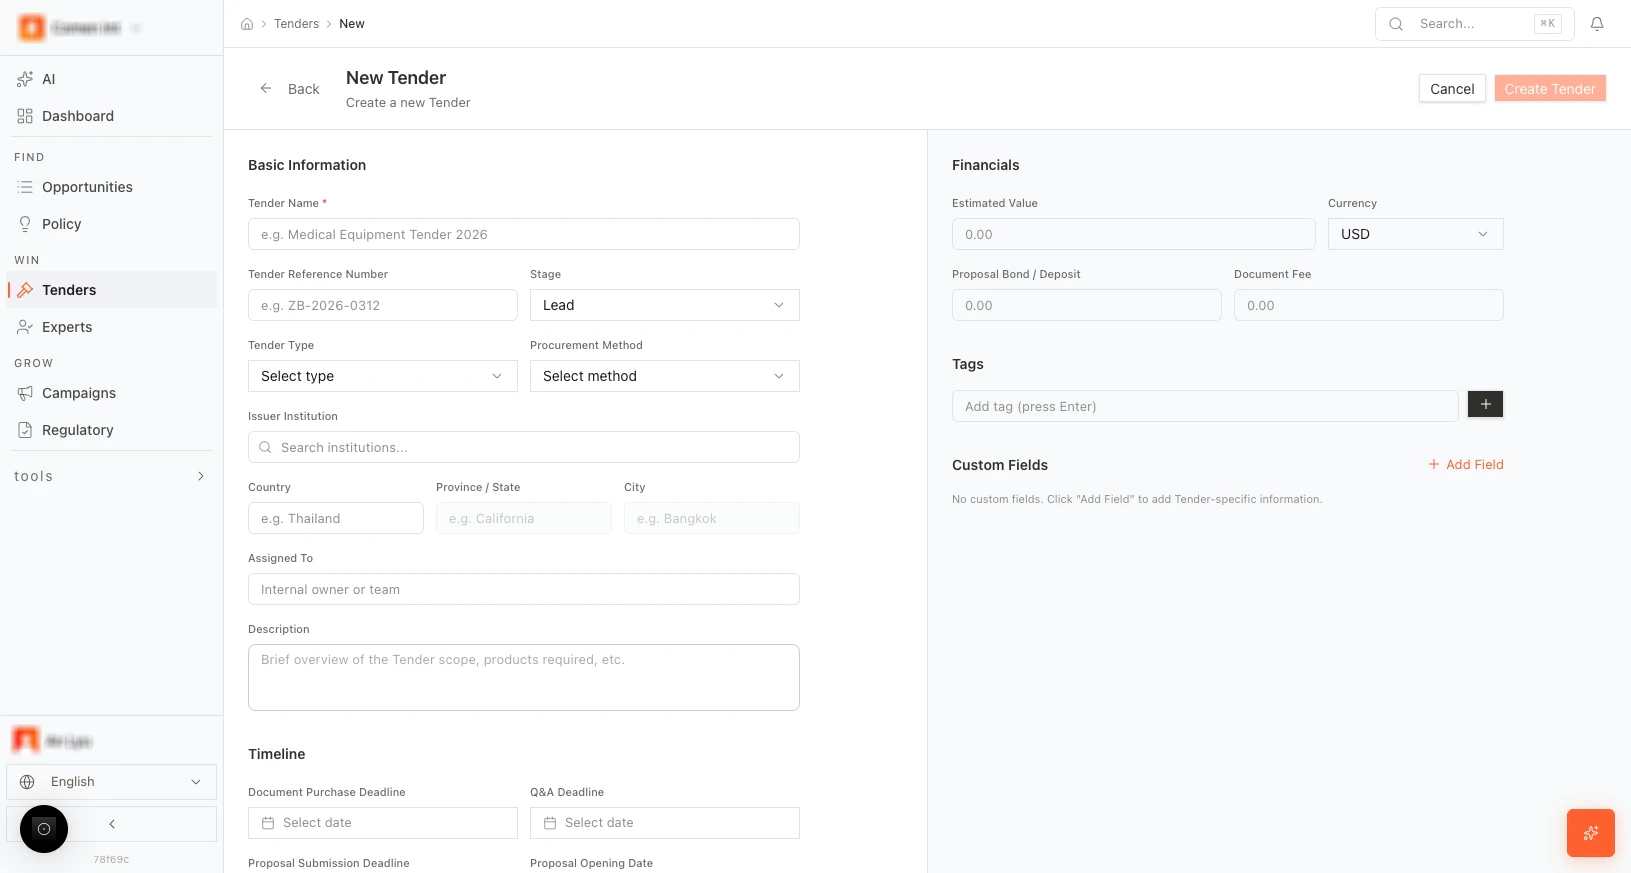
Open New Tender: https://app.medstrato.com/bids/new The New Tender form is split into sections. Fill in as much as possible so that AI compliance and win analysis work better later. Basic information:- Tender Name* (required) — Short name for the tender.
- Tender Reference Number — Reference or ID from the issuer.
- Stage — Current stage (e.g. Lead, Evaluating, Preparing). Default is often Lead.
- Tender Type — Type of procurement (e.g. open, restricted).
- Procurement Method — Method (e.g. competitive bidding).
- Issuer Institution — Search and select the issuing institution.
- Country — Country of the tender.
- Province/State — Province or state, if applicable.
- City — City, if applicable.
- Assigned To — Team member responsible for the tender.
- Description — Free-text description of the tender.
- Estimated Value — Estimated contract value.
- Currency — Currency for amounts.
- Proposal Bond / Deposit — Bond or deposit required, if any.
- Document Fee — Fee to obtain documents, if any.
- Tags — Add tags for filtering and search.
- Custom fields — + Add Field to add custom key-value fields (e.g. internal codes, categories).
- Document purchase deadline — Last date to purchase tender documents.
- Q&A deadline — Last date to submit questions.
- Proposal submission deadline — Submission due date.
- Proposal opening date — Date when proposals are opened.
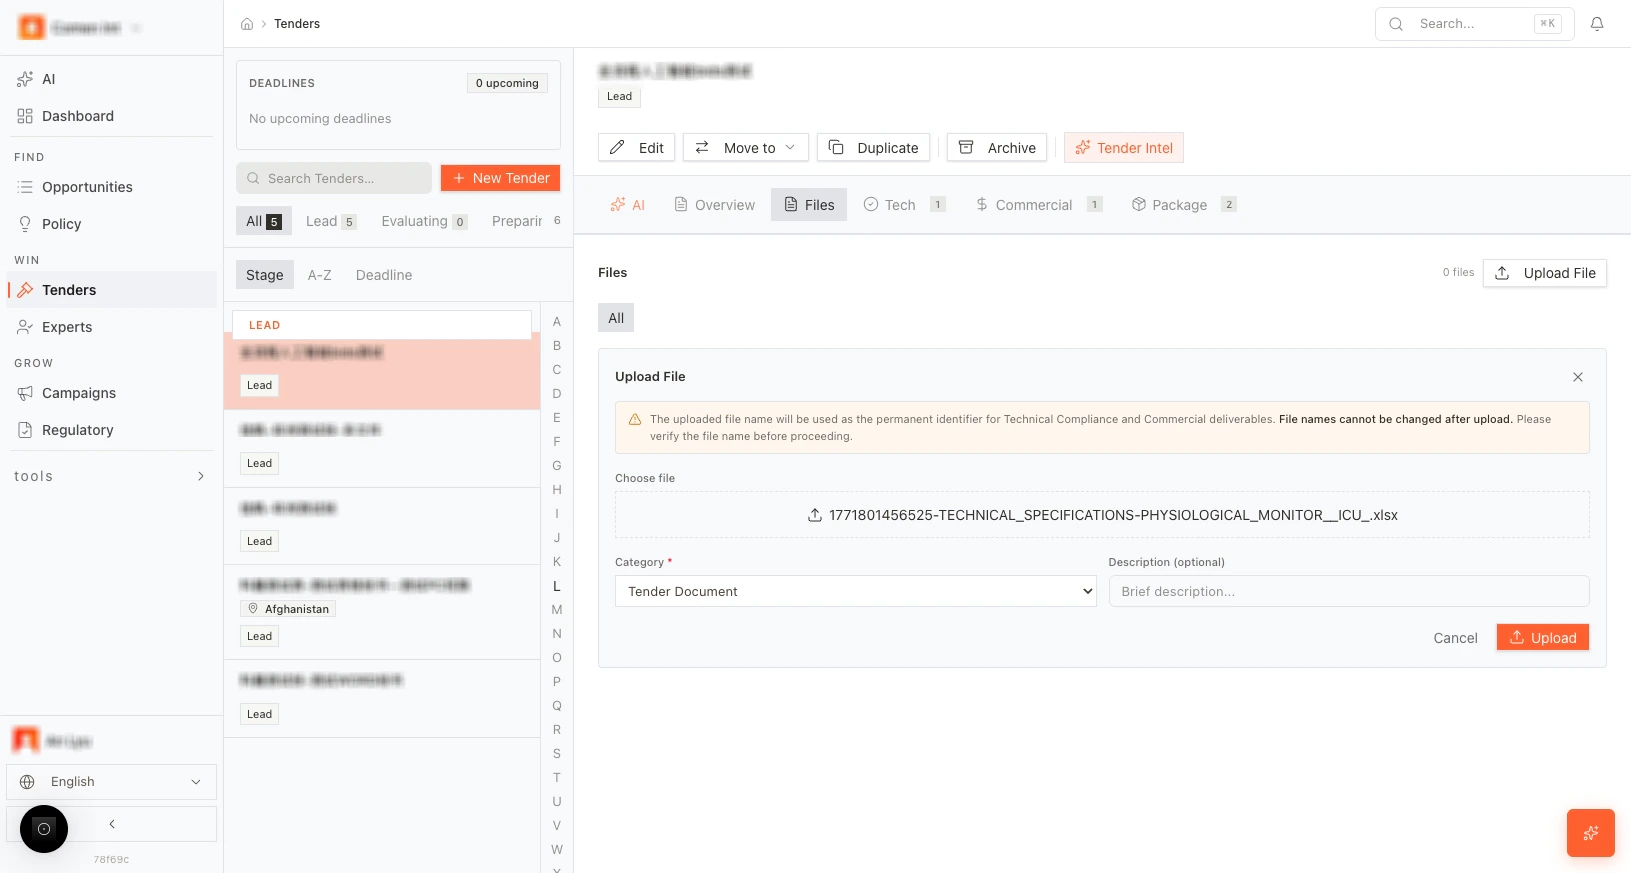
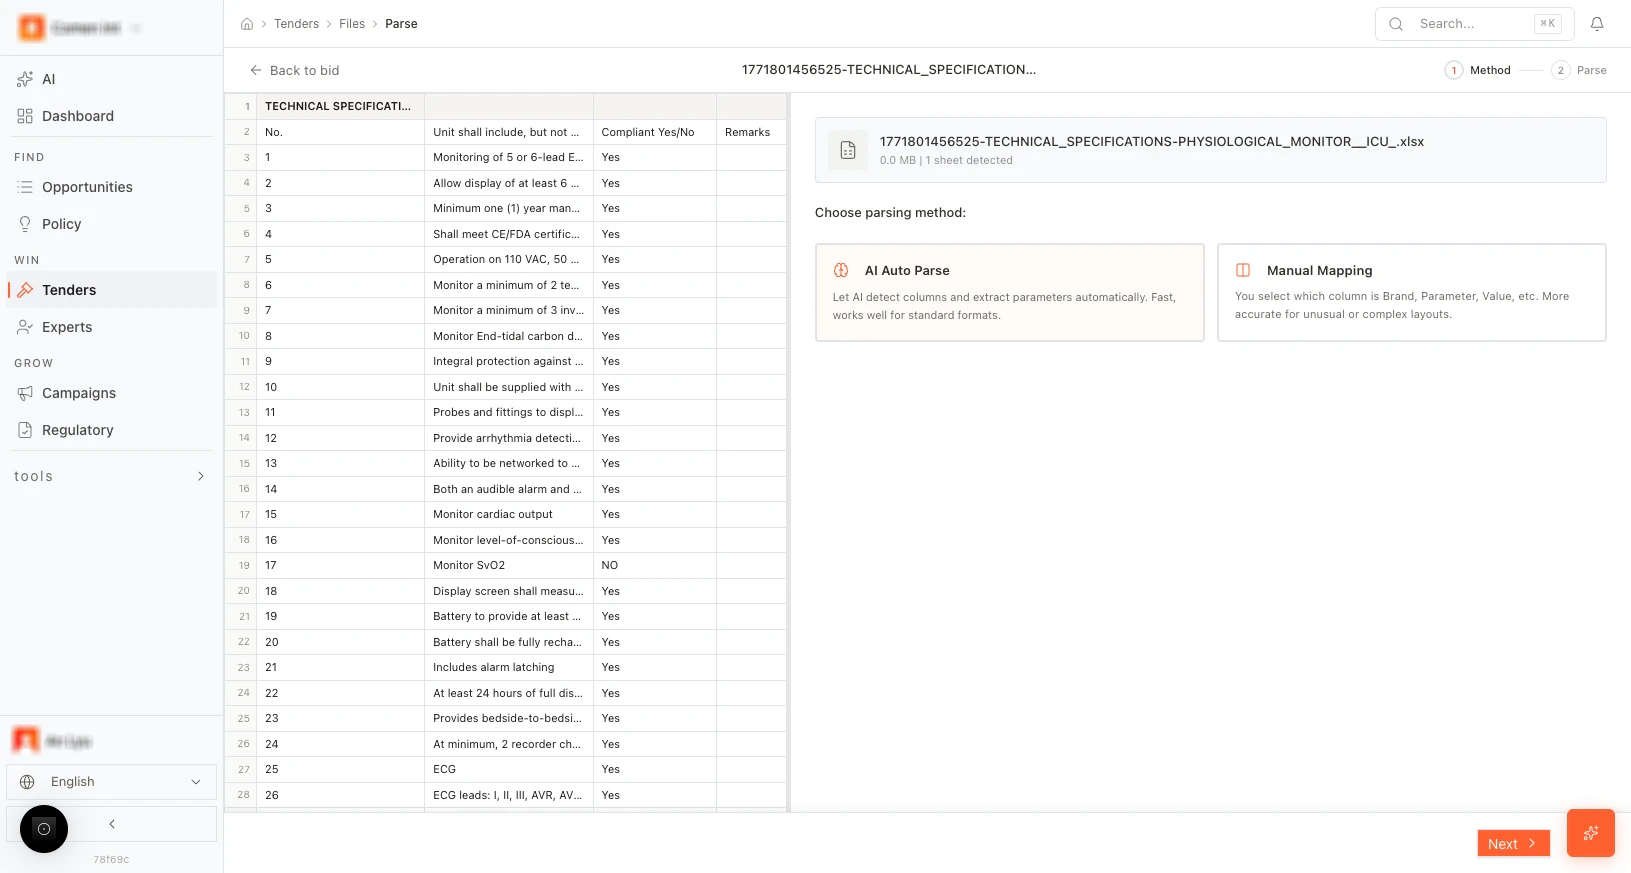
Documents and parse
- Upload: In the Files (or equivalent) tab, upload technical specifications, RFP documents, and any other tender documents. Supported formats typically include PDF, DOCX.
- Parse step: After upload, start the parse step. Choose AI parse (or equivalent) to extract requirements, sections, and parameters from the documents.
- Parse result: After AI parse you see a structured breakdown: categories and parameters (e.g. “1 category, 47 parameters”). A Matched percentage (e.g. “Matched 0%”) shows how many requirements are linked to your products; it updates as you match products in the Technical editor. From this screen you enter the Tech (Technical) editor.
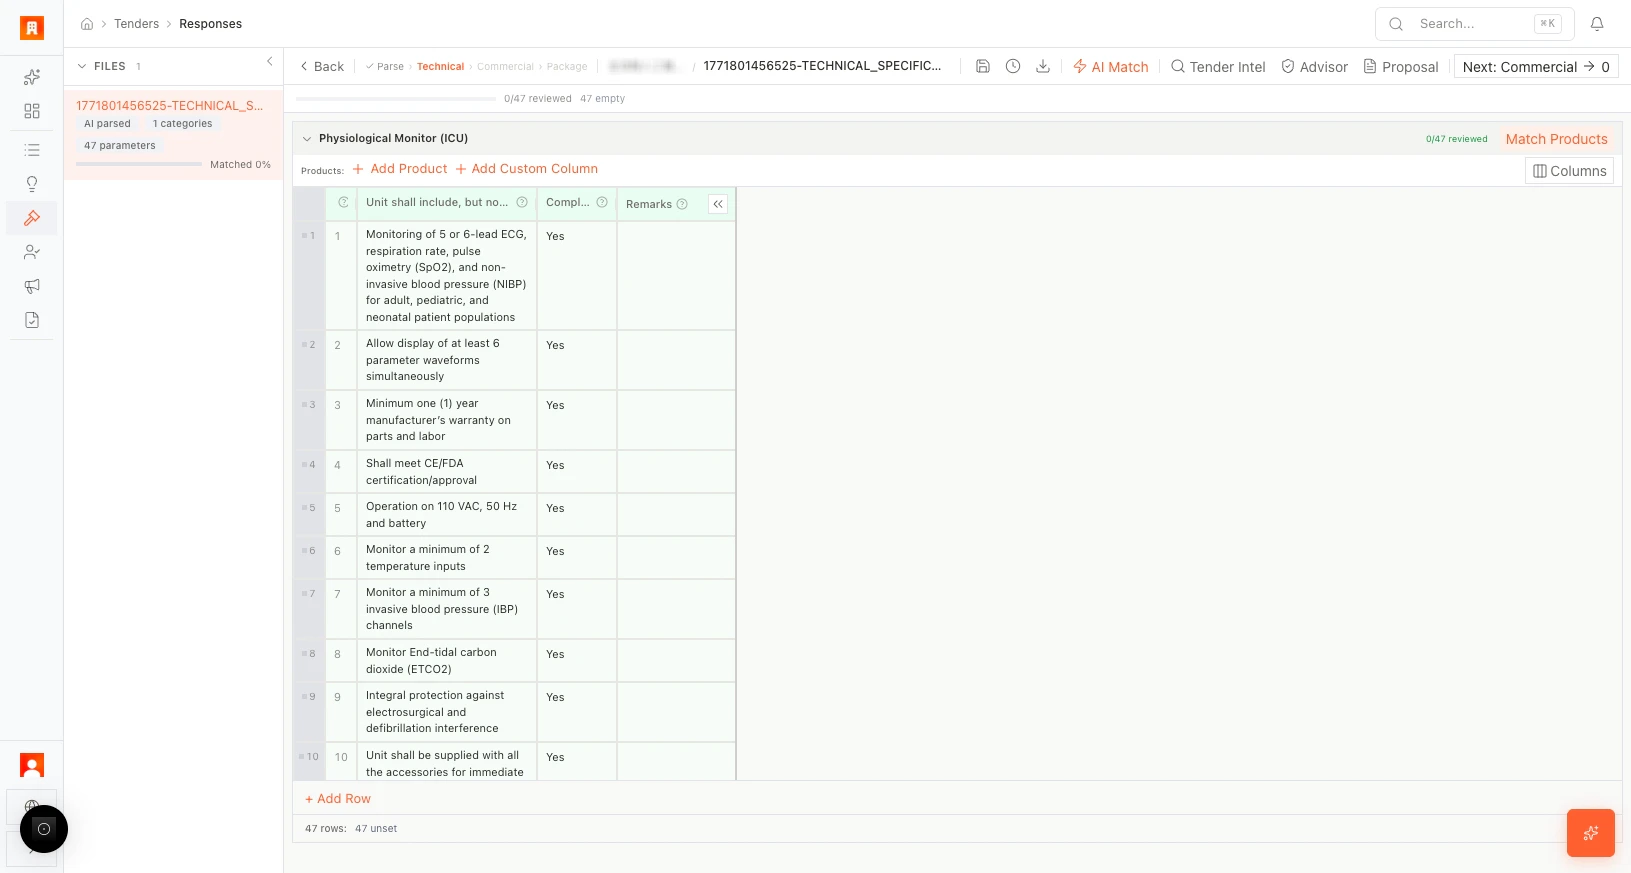
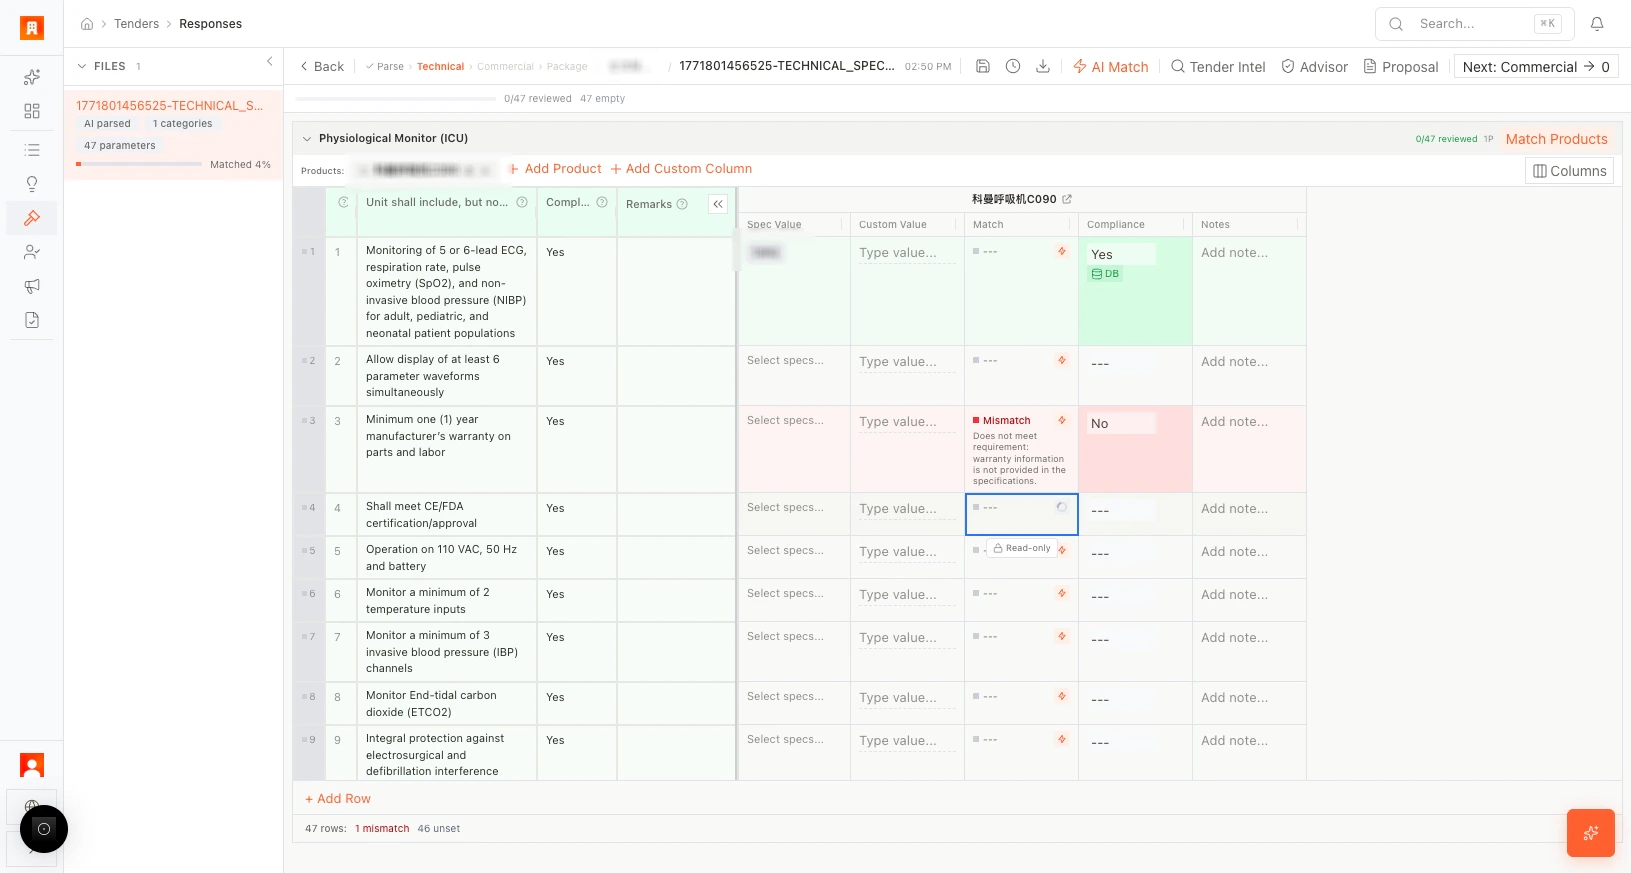
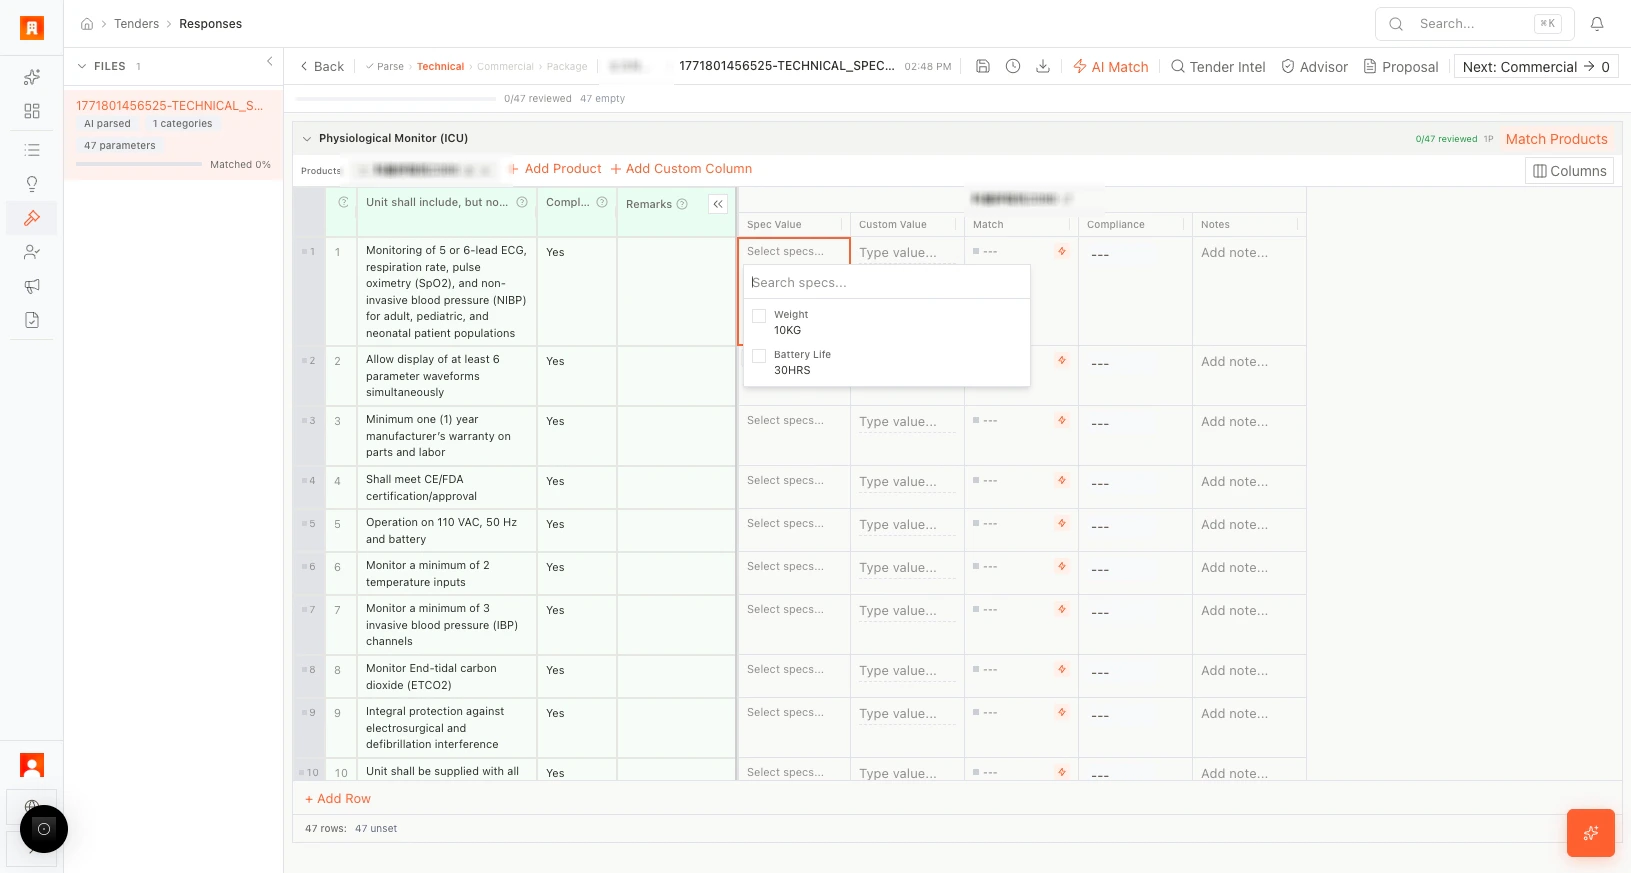
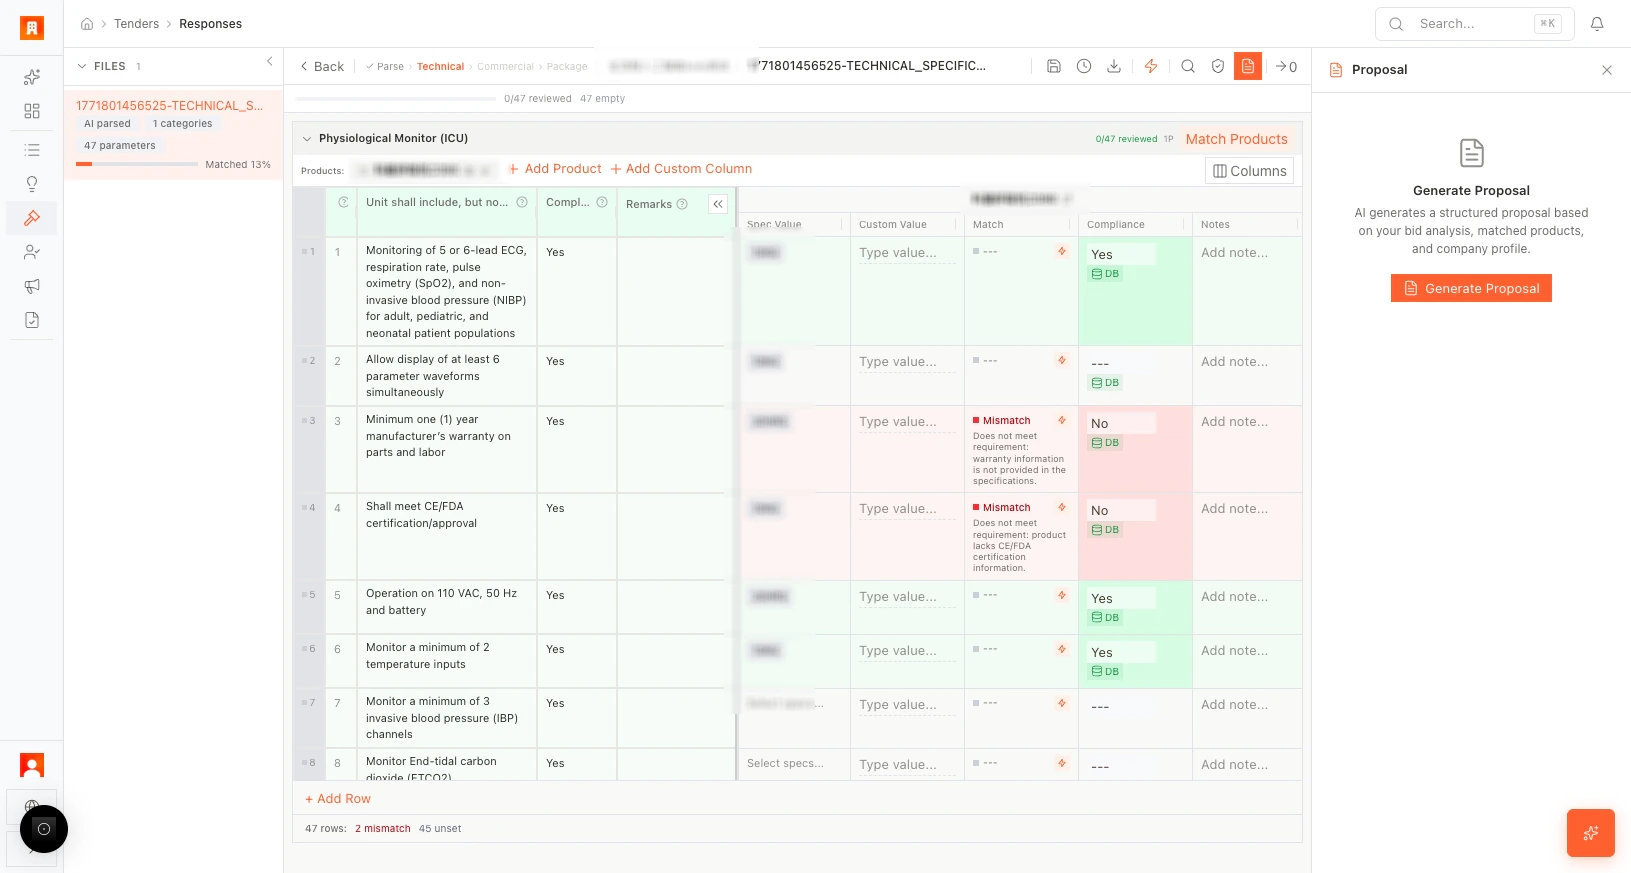
Technical editor (Tech tab)
The Technical editor lets you align your products with the tender requirements and build compliance and proposal text.
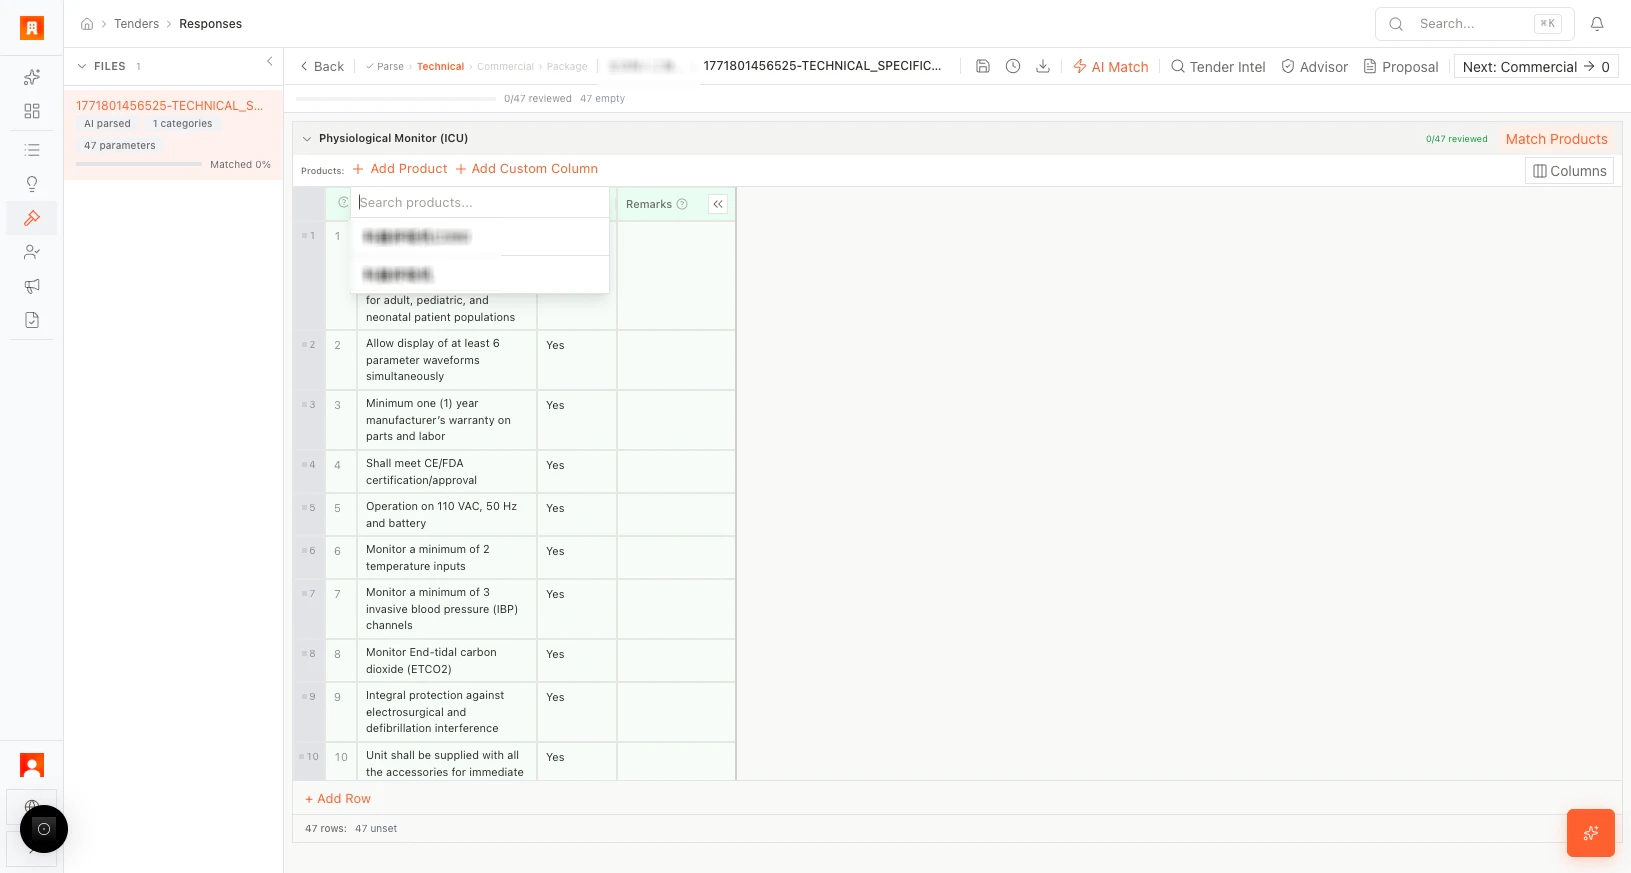
- Products: + Add Product to add products from your catalog. Match Products (or similar) to link requirements to products. Use Columns to show or hide columns (e.g. requirement text, product, compliance, notes).
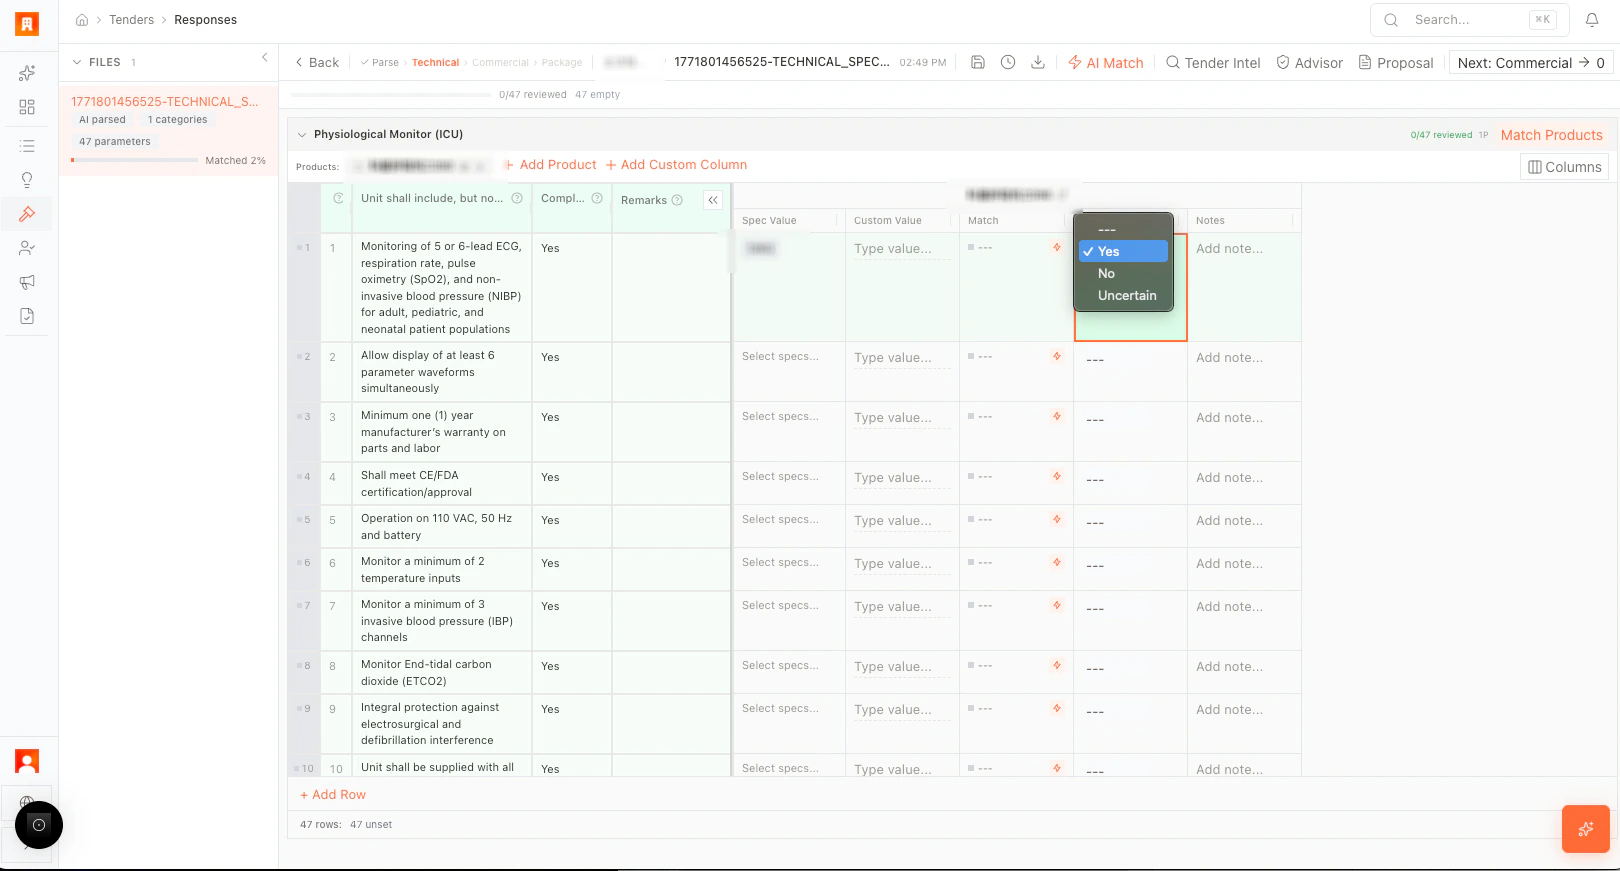
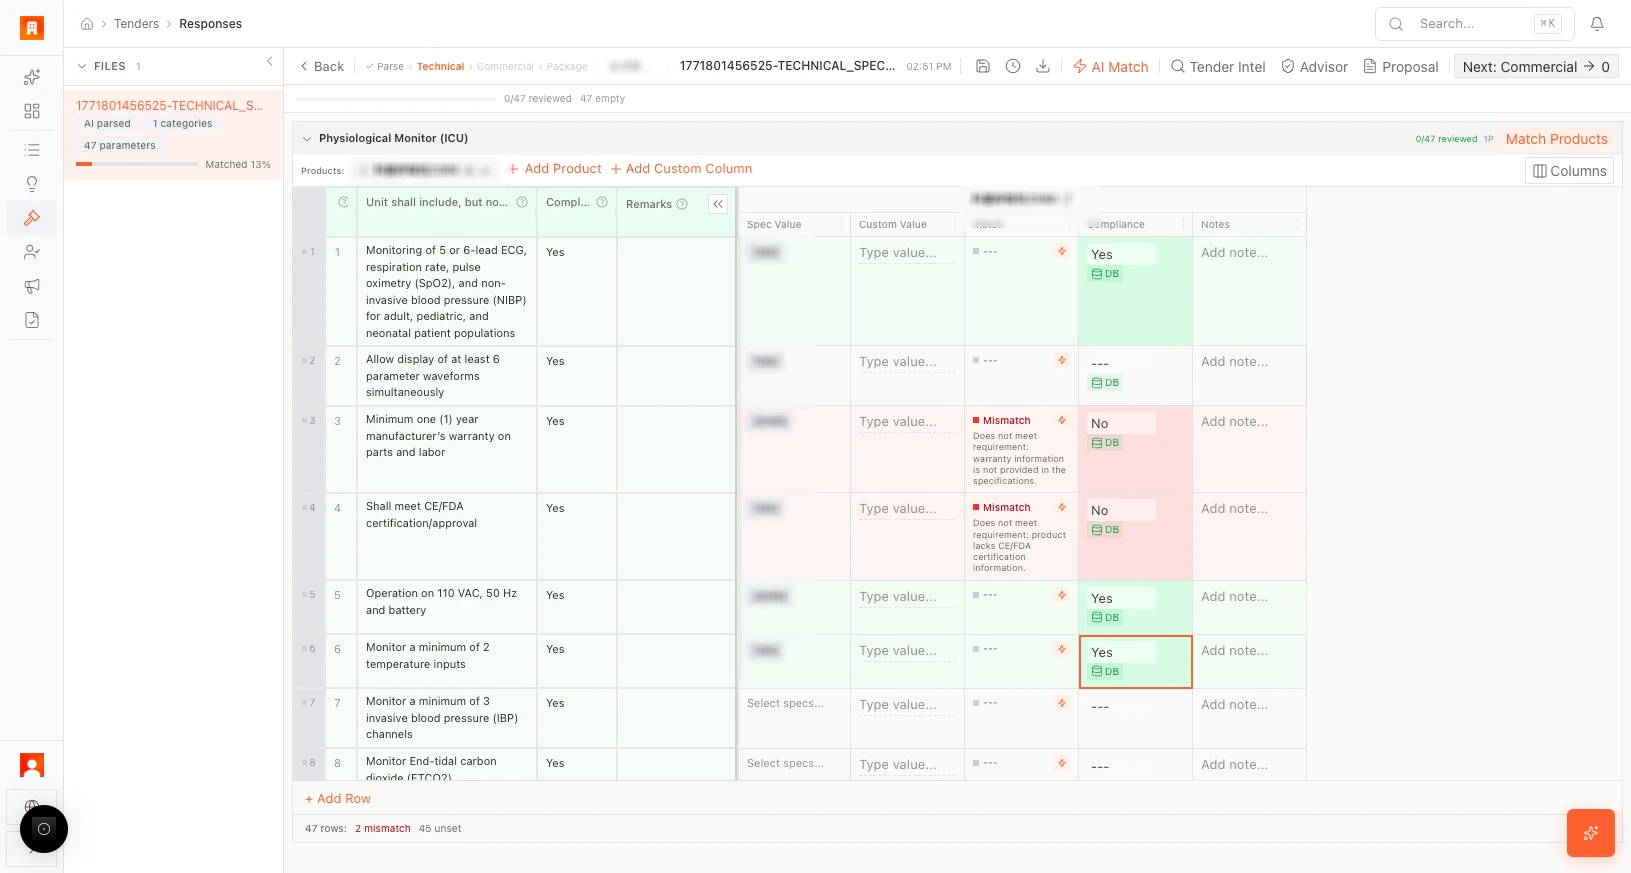
- Compliance: For each parameter or requirement, set compliance (e.g. Yes / No / Partial). You can use an AI check per parameter to get a suggested compliance answer.
- Requirement mapping: For each requirement, select the concrete product parameter or value that satisfies it (e.g. from a dropdown or search).
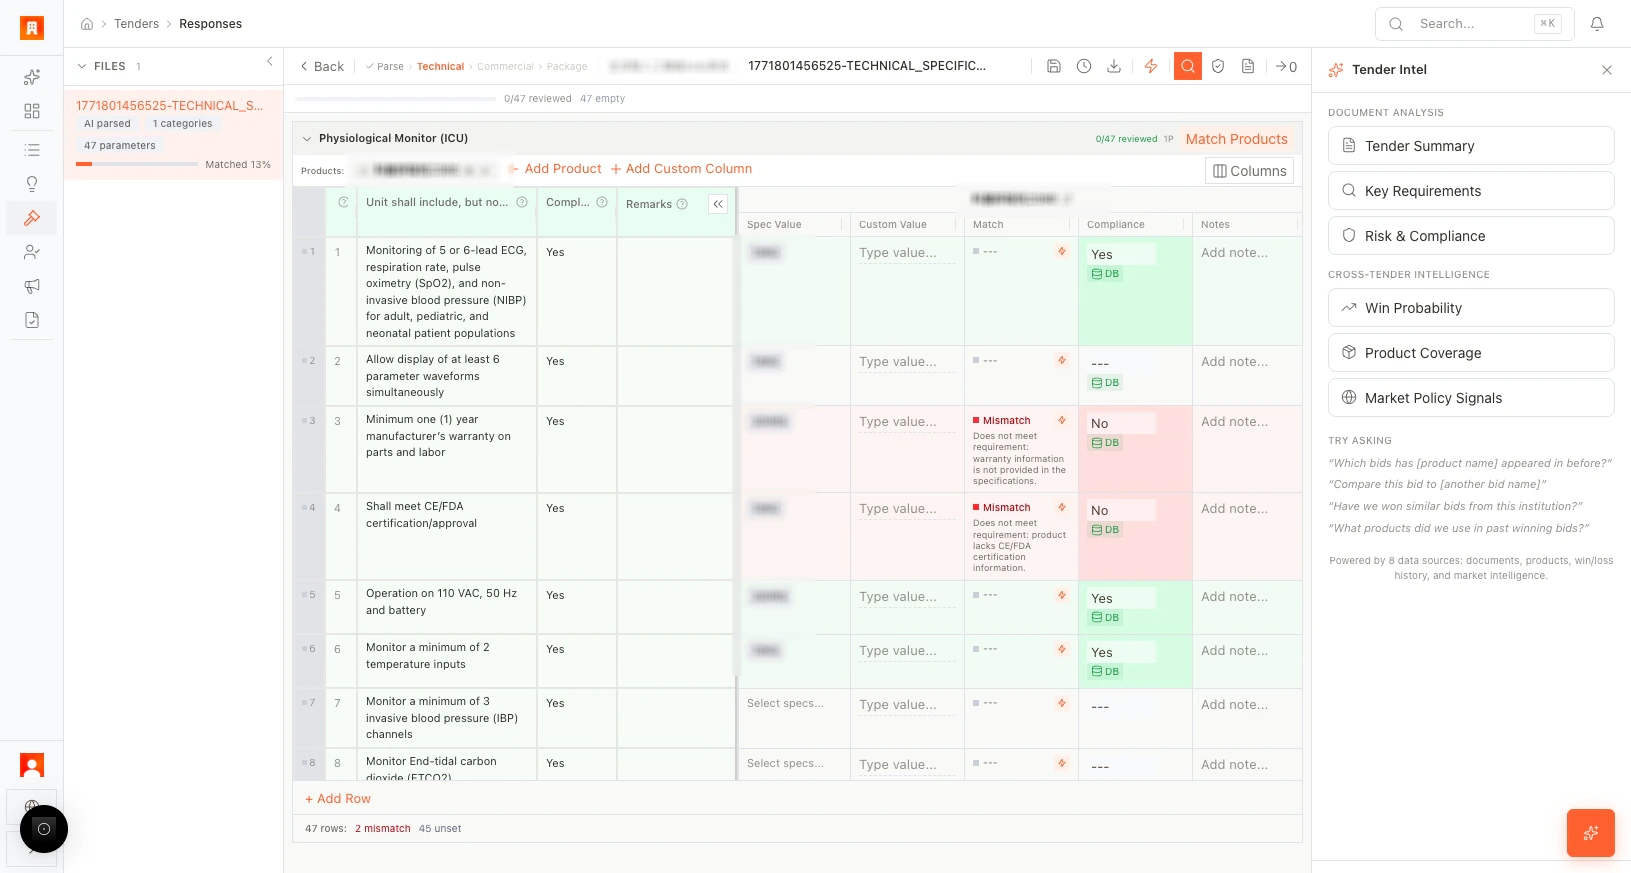
- Tender Intel: Ask Tender Intel (e.g. top-right) opens a panel where you can ask questions about the tender (e.g. “What are the key technical risks?”). Answers are based on the parsed documents and your products.
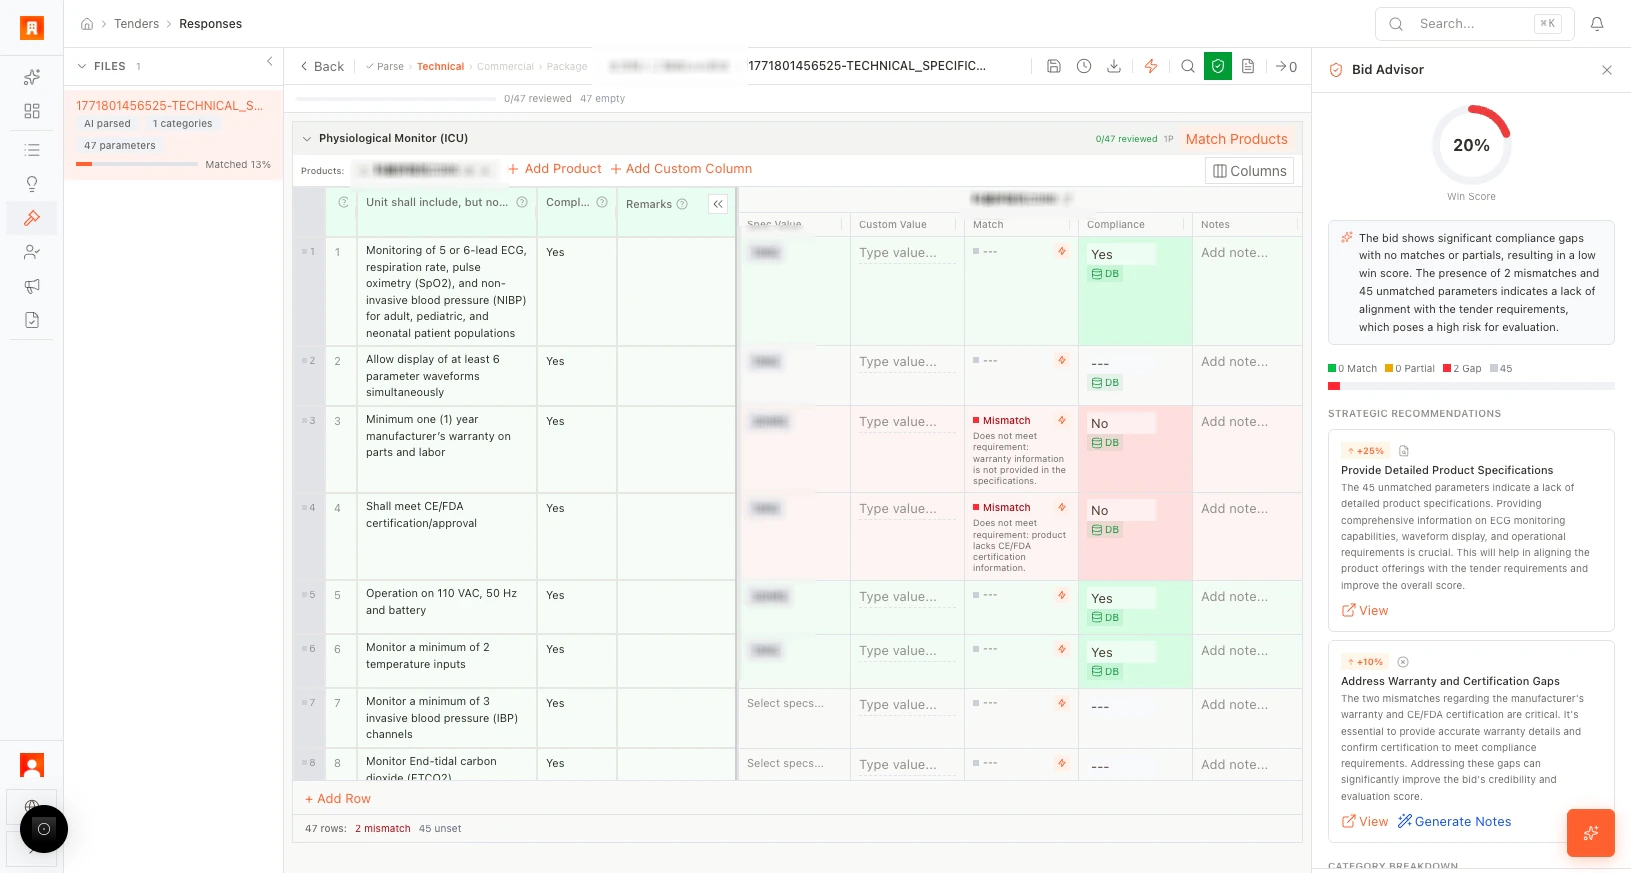
- WIN assessment: Use the WIN assessment tool to score parameters and competitiveness (e.g. strength vs. requirements).
- Proposal text: Generate proposal text for the current page or section (AI-generated narrative for compliance and differentiators).
- Custom columns: + Add to add custom columns (e.g. notes, internal comments).
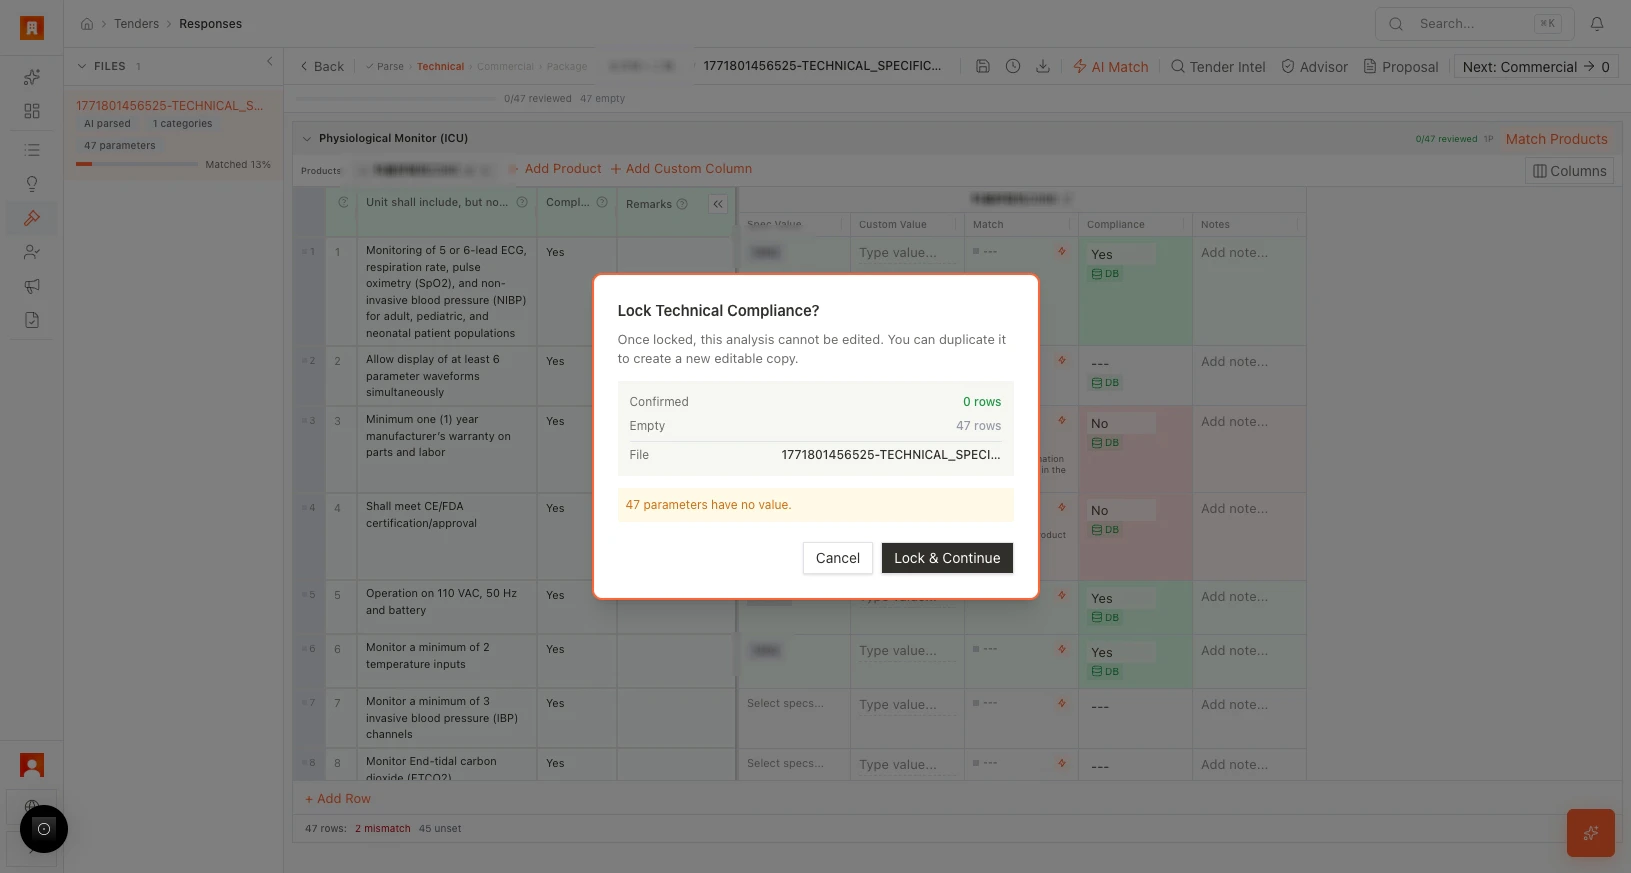
- Navigate to Commercial: When technical compliance and mapping are done, use the button (e.g. “Go to Commercial” or “Quotation”) to open the Commercial (quotation) editor.
- Leaving the editor: The app may warn if work is incomplete (e.g. unmatched requirements) and note that the file may be locked for editing by another user. Save and complete as needed before switching tabs.

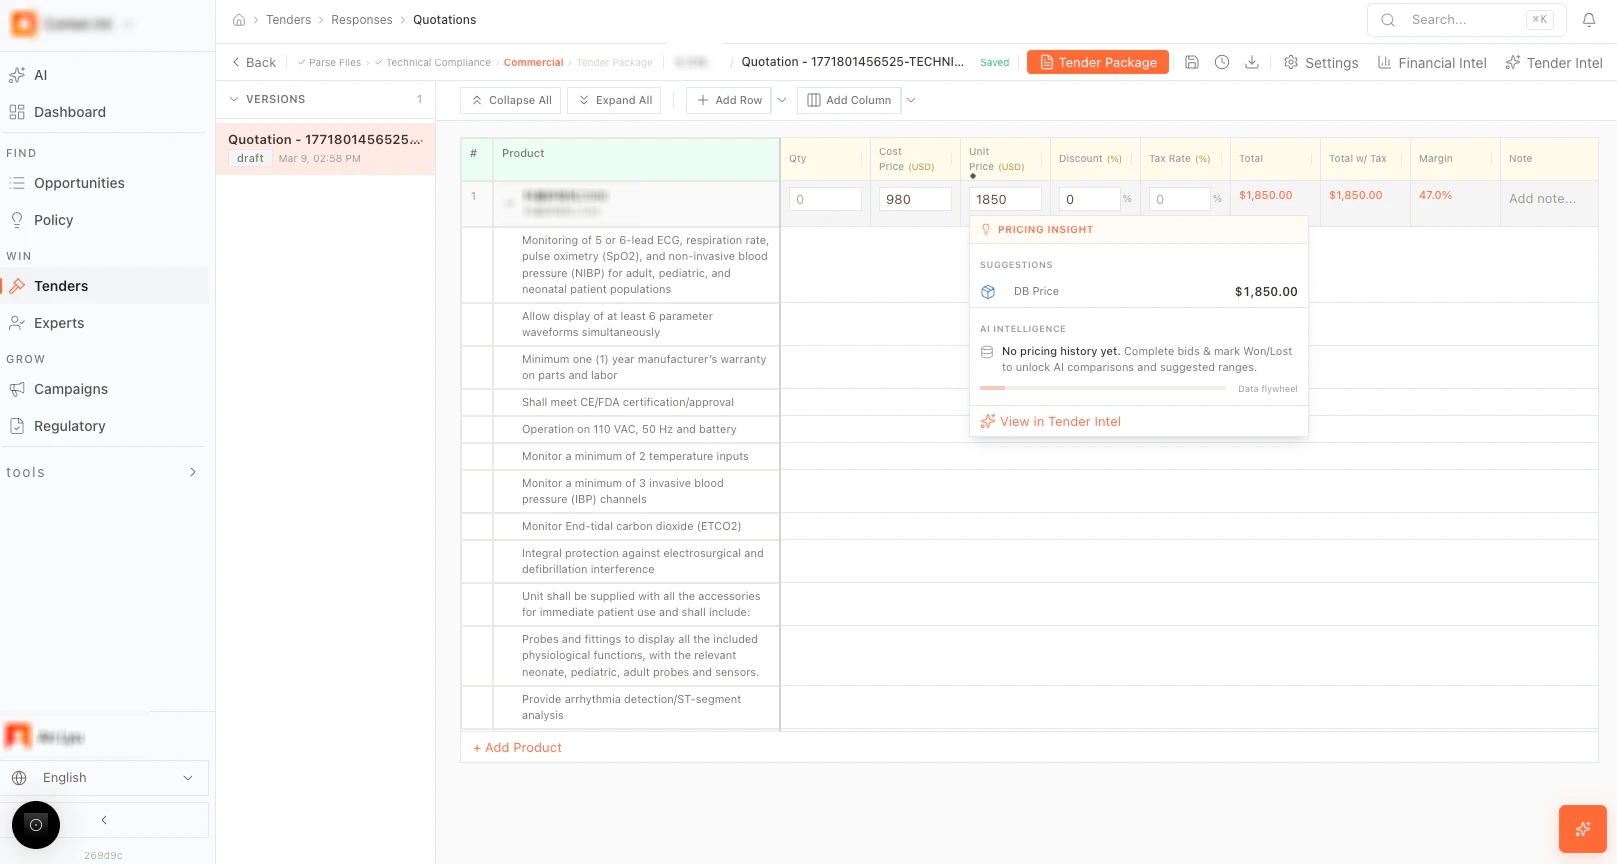
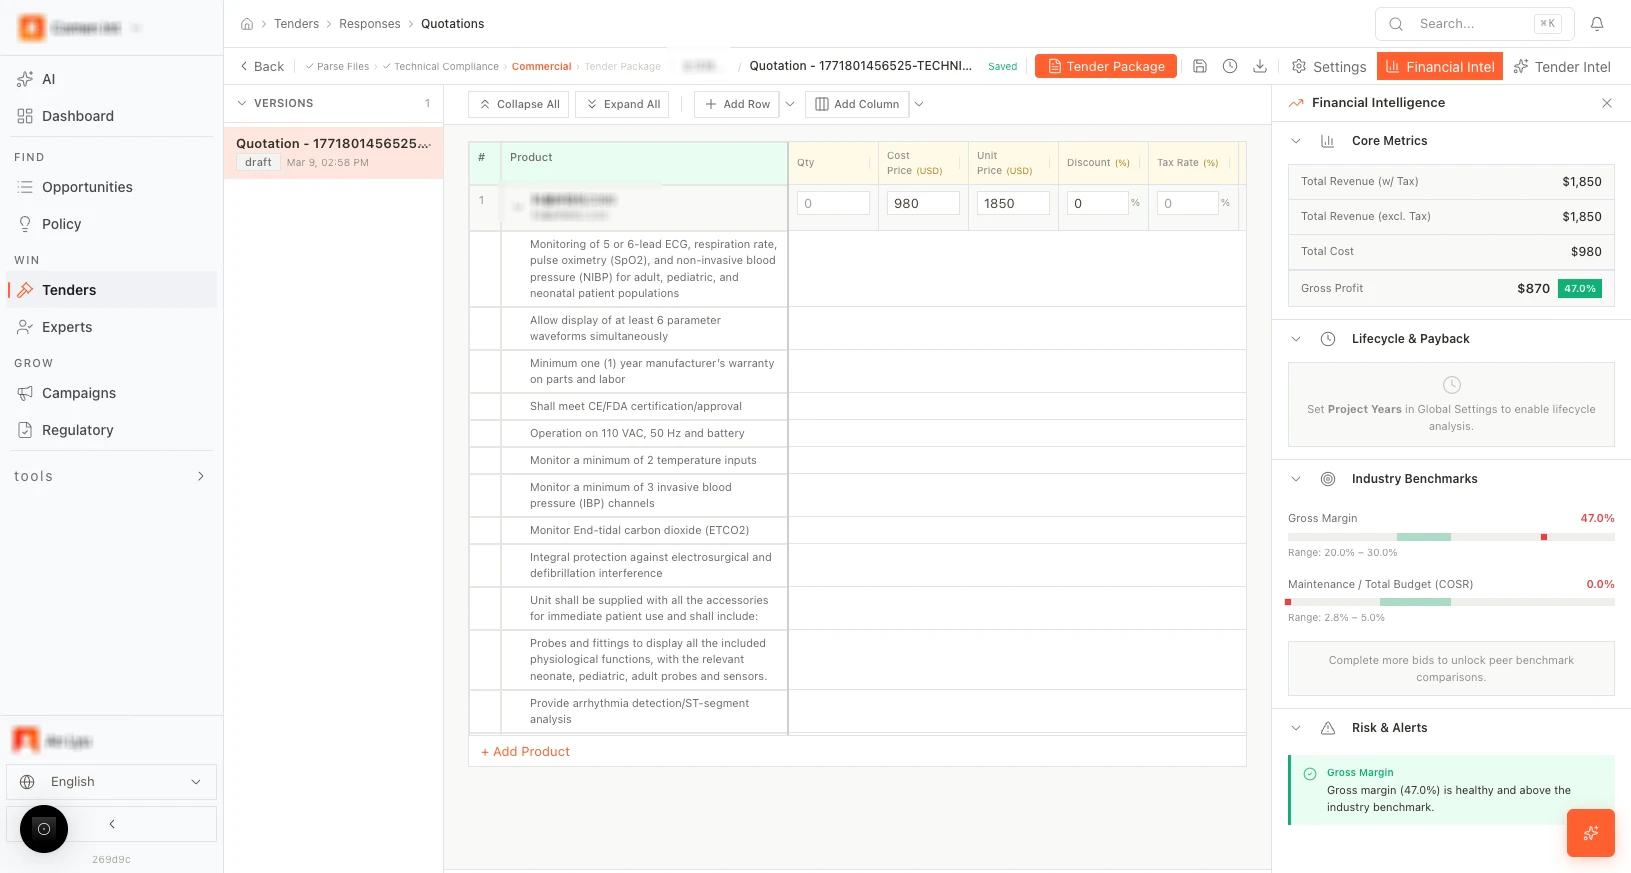
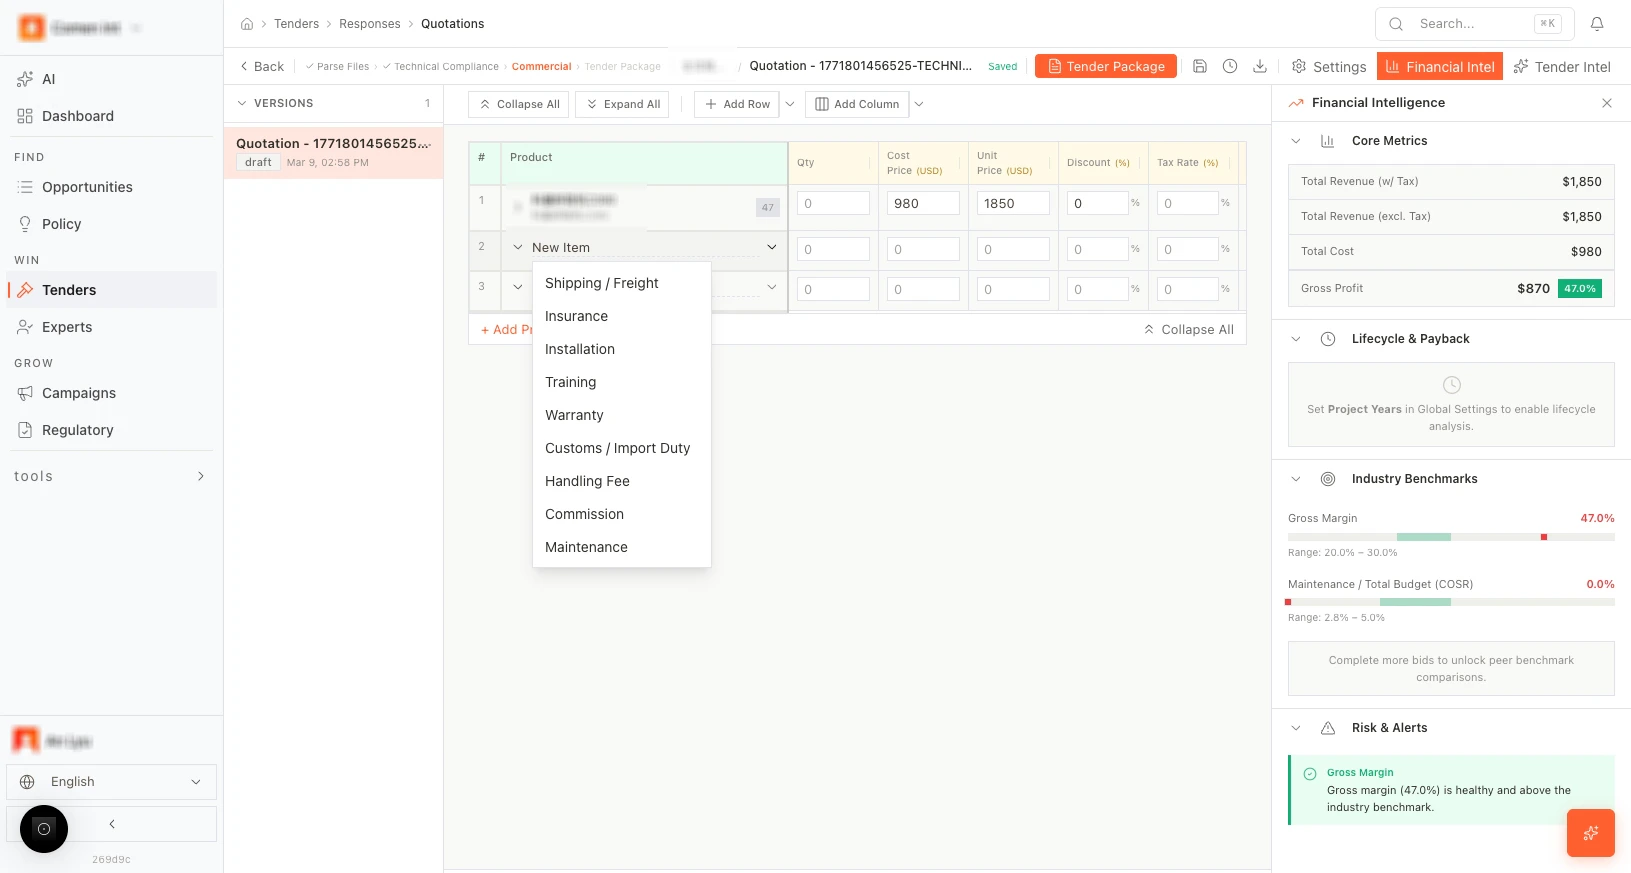
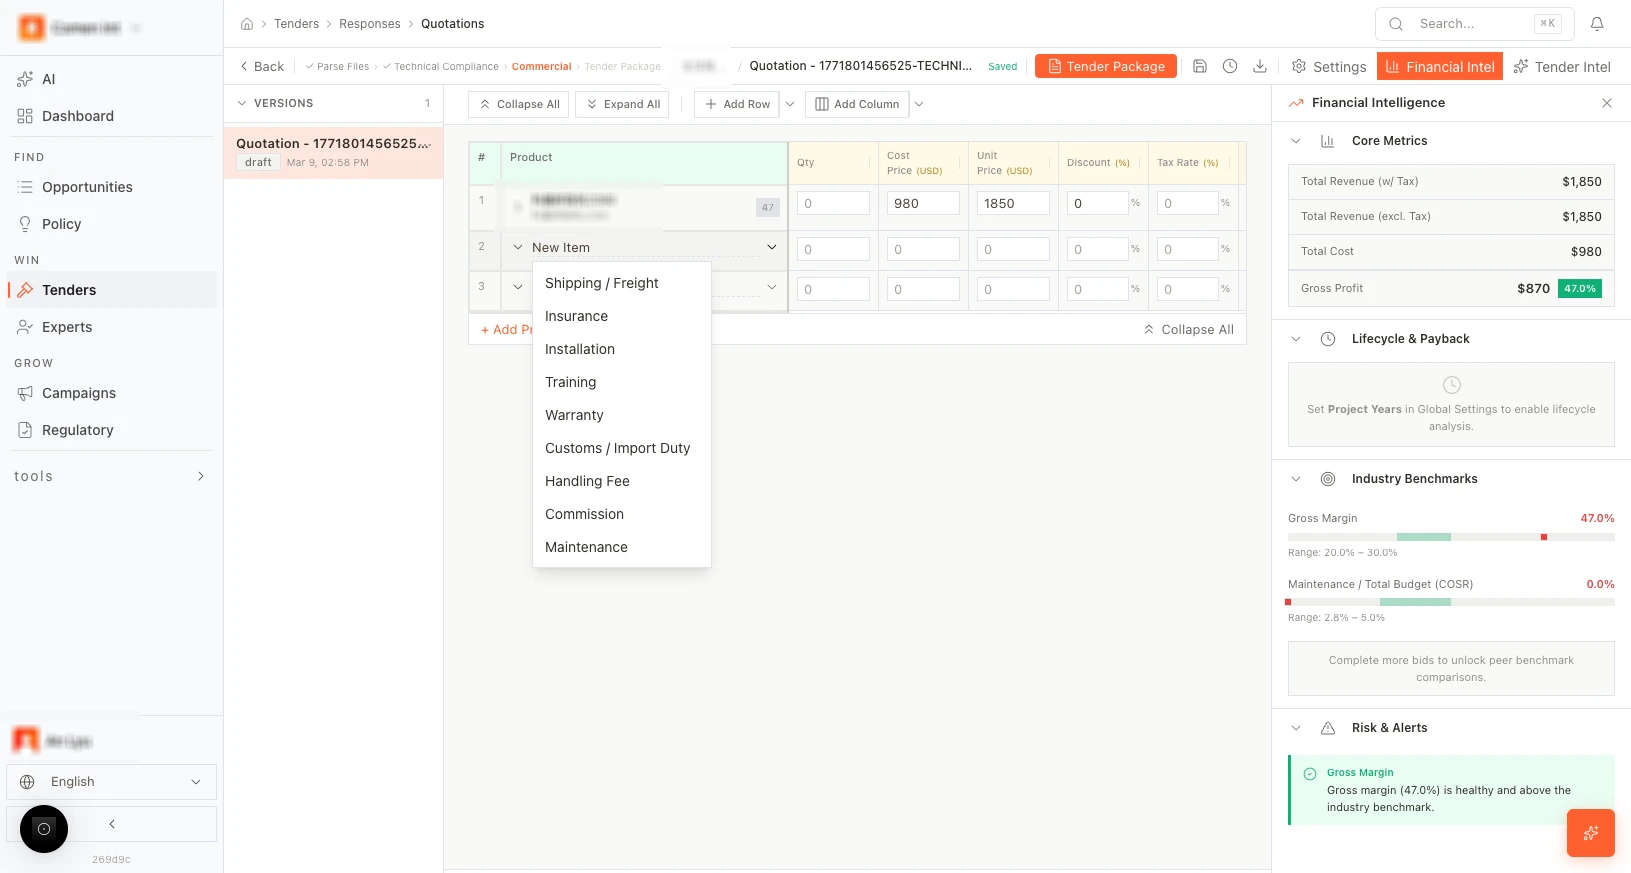
Commercial (quotation) editor
The quotation table is built from the products you added and matched in the Technical editor.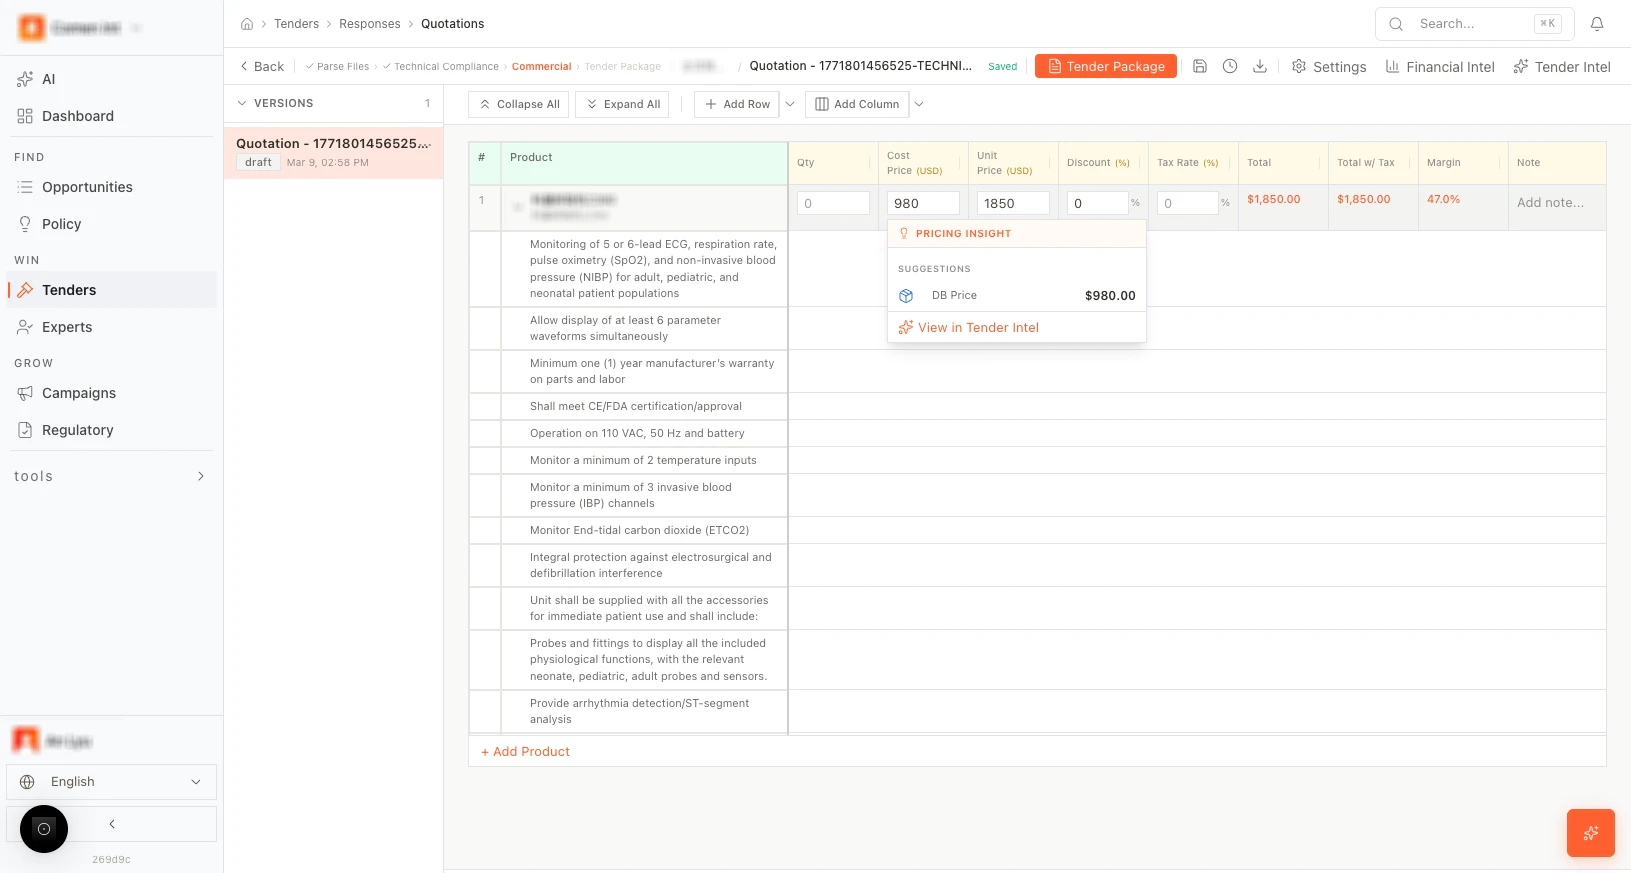
- Columns: Qty, Cost price, Unit price, Discount, Tax, Totals, Margin, Note. You can add more columns (e.g. fees) with + Add Column. + Add Row adds extra lines (e.g. for additional items or fees).
- Quick suggestions: Hover over a cell (e.g. unit price) to see quick suggestions (e.g. common prices, “DB Price”). Click to apply a suggestion.
- Financial tools: Use the top bar or sidebar for margin and gross profit (e.g. profitability summary, target margin). Adjust prices and discounts to hit targets.
- Navigate to Tender Package: When the quotation is ready, use the button (e.g. “Go to Tender Package” or “Package”) to open the Tender Package tab and generate the proposal document.


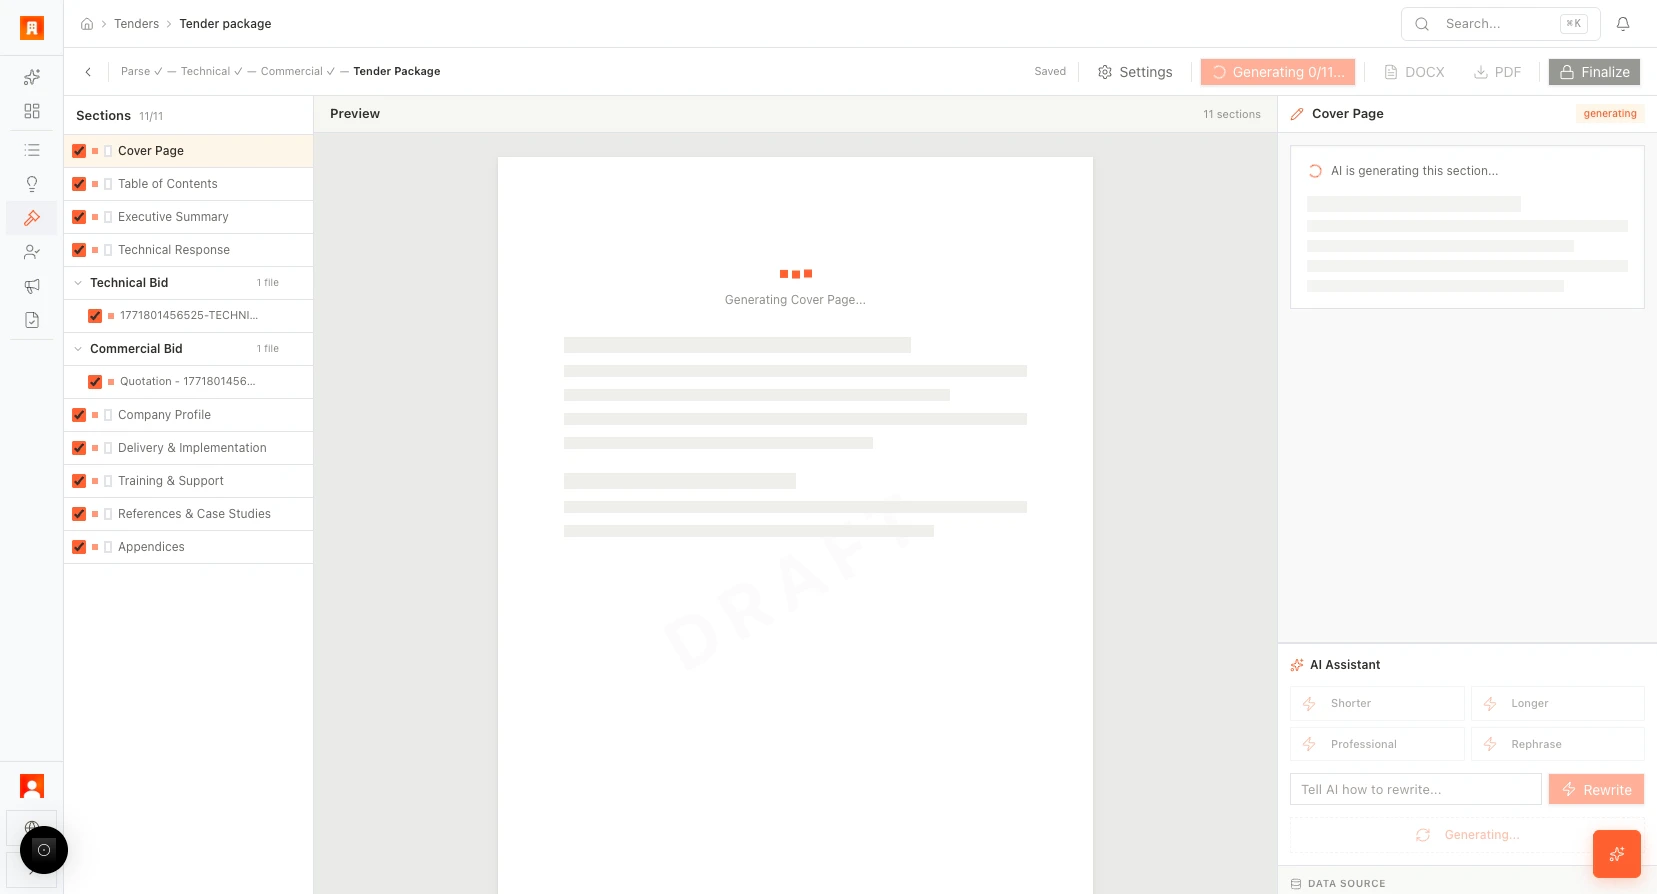
Tender Package (proposal document)
The Tender Package tab produces the final proposal document (cover, TOC, executive summary, technical and commercial sections) that you can export and submit.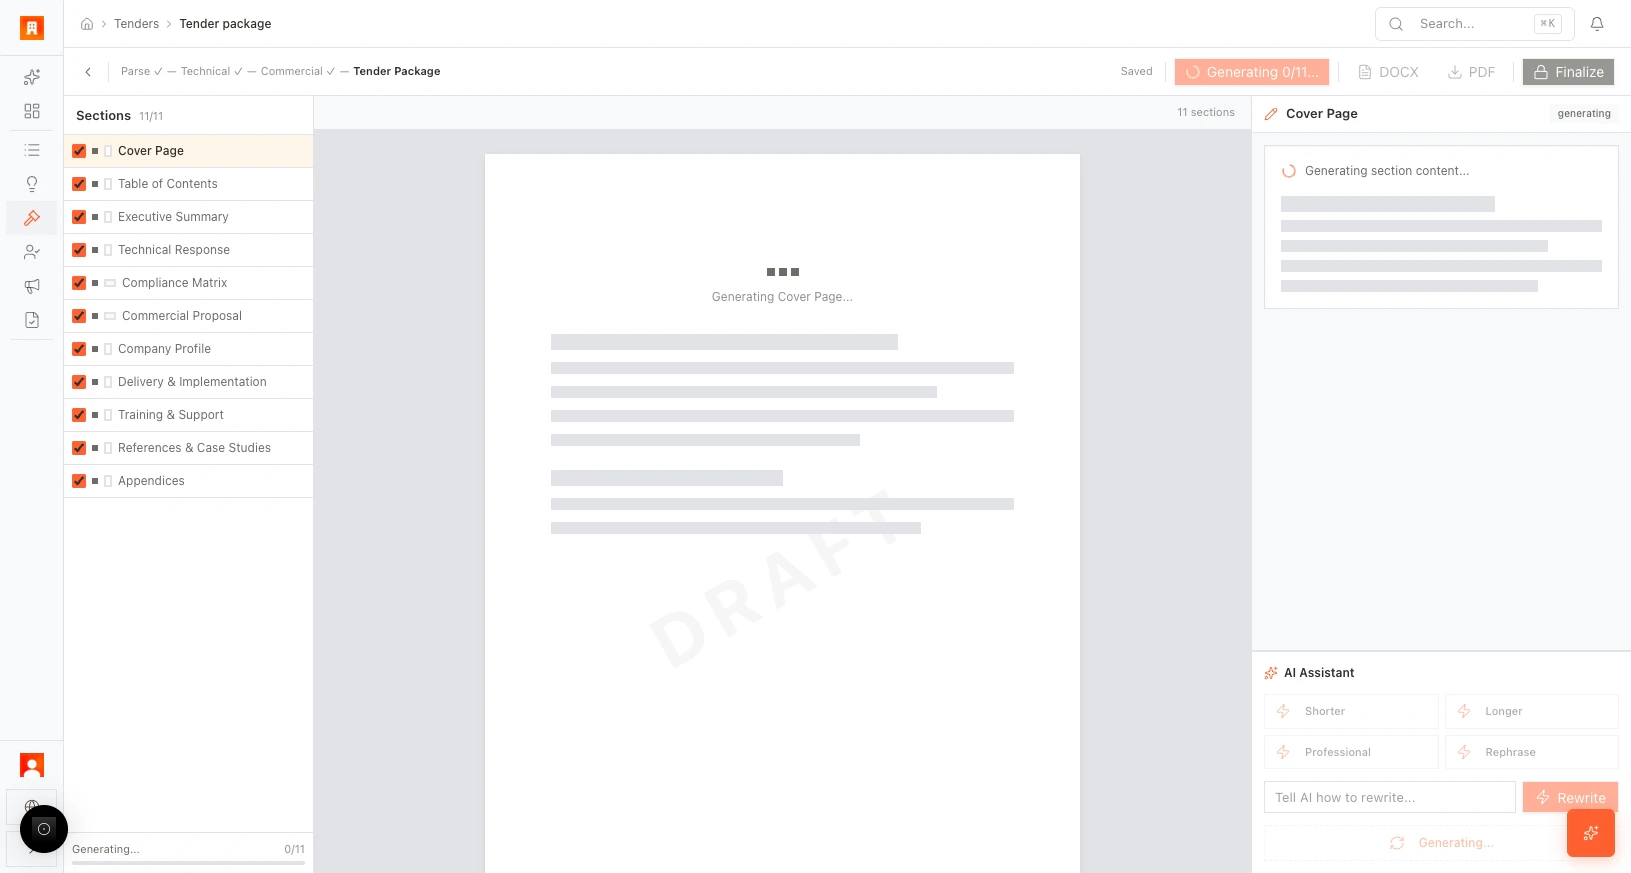
- Section list (left panel): Sections such as Cover, TOC, Executive Summary, Technical Approach, Commercial Summary, etc. Use checkboxes to include or exclude sections from the generated document.
- Generate: Generate all (or global generate) runs AI to generate the selected sections. Progress shows e.g. “Generating 0/11…”. A DRAFT watermark appears while the document is in progress.
- AI edit panel (right): Click a section to edit it. In the right-hand AI edit panel you can refine content:
- Shorter — Shorten the text.
- Longer — Expand the text.
- Professional — Make the tone more professional.
- Rephrase — Rephrase for clarity.
- Custom instruction: “Tell AI how to rewrite…” then Rewrite to apply.
- Export and finalize: When the document is ready:
- Export DOCX — Download the package as a Word document.
- Export PDF — Download as PDF.
- Finalize — Lock the document and remove the draft state. The Finalize Tender Package? dialog asks for confirmation; after you confirm, the package is marked final and further edits may be restricted.


Step-by-step: Create a tender and run through to Tender Package
- Create the tender: Open New Tender. Fill Tender Name* (required), Tender Reference Number, Stage, Country, Issuer Institution, Estimated Value, Currency, and the timeline dates. Click Create Tender.
- Upload and parse: In the tender’s Files tab, upload the RFP/technical documents. Start the parse step and choose AI parse. Wait for categories and parameters to appear (e.g. “1 category, 47 parameters”).
- Technical editor: Open the Tech tab. + Add Product and Match Products to link requirements to your products. Set compliance (Yes/No) per parameter. Use Ask Tender Intel for questions and generate proposal text for sections. When done, go to the Commercial editor.
- Commercial editor: In the Commercial tab, review Qty, Unit price, Discount, Margin. Use quick suggestions (e.g. “DB Price”) and the margin tools. + Add Row or + Add Column if needed. When ready, go to Tender Package.
- Tender Package: In the Package tab, select the sections to include and click Generate all. Wait for “Generating 0/11…” to complete. Use the AI edit panel (Shorter, Longer, Professional, Rephrase, or custom Rewrite) to refine each section. Then Export DOCX or Export PDF, and click Finalize to lock the package (confirm in Finalize Tender Package?).
Chapter 5: Post-bid evaluation
After a tender is decided (won or lost), you update its stage and complete Bid Debrief. The system uses this feedback to learn from outcomes and to improve future opportunity scoring and bid strategy. This chapter describes Move to (stage management) and the Bid Debrief form for both Won and Lost. Open Tenders: https://app.medstrato.com/tenders Screenshot reference: 5-2-TENDERS — Post-bid: stage (Move to), Bid Debrief (Won), Bid Debrief (Lost).Stage management (Move to)
For a selected tender, use Move to (in the list or on the tender detail) to set the current stage. The available stages are:- Evaluating — Under evaluation
- Preparing — Preparing the bid
- Quoting — Working on pricing
- Submitted — Proposal submitted
- Pending Result — Awaiting result
- Won — Tender won
- Lost — Tender lost
- Cancelled — Tender cancelled
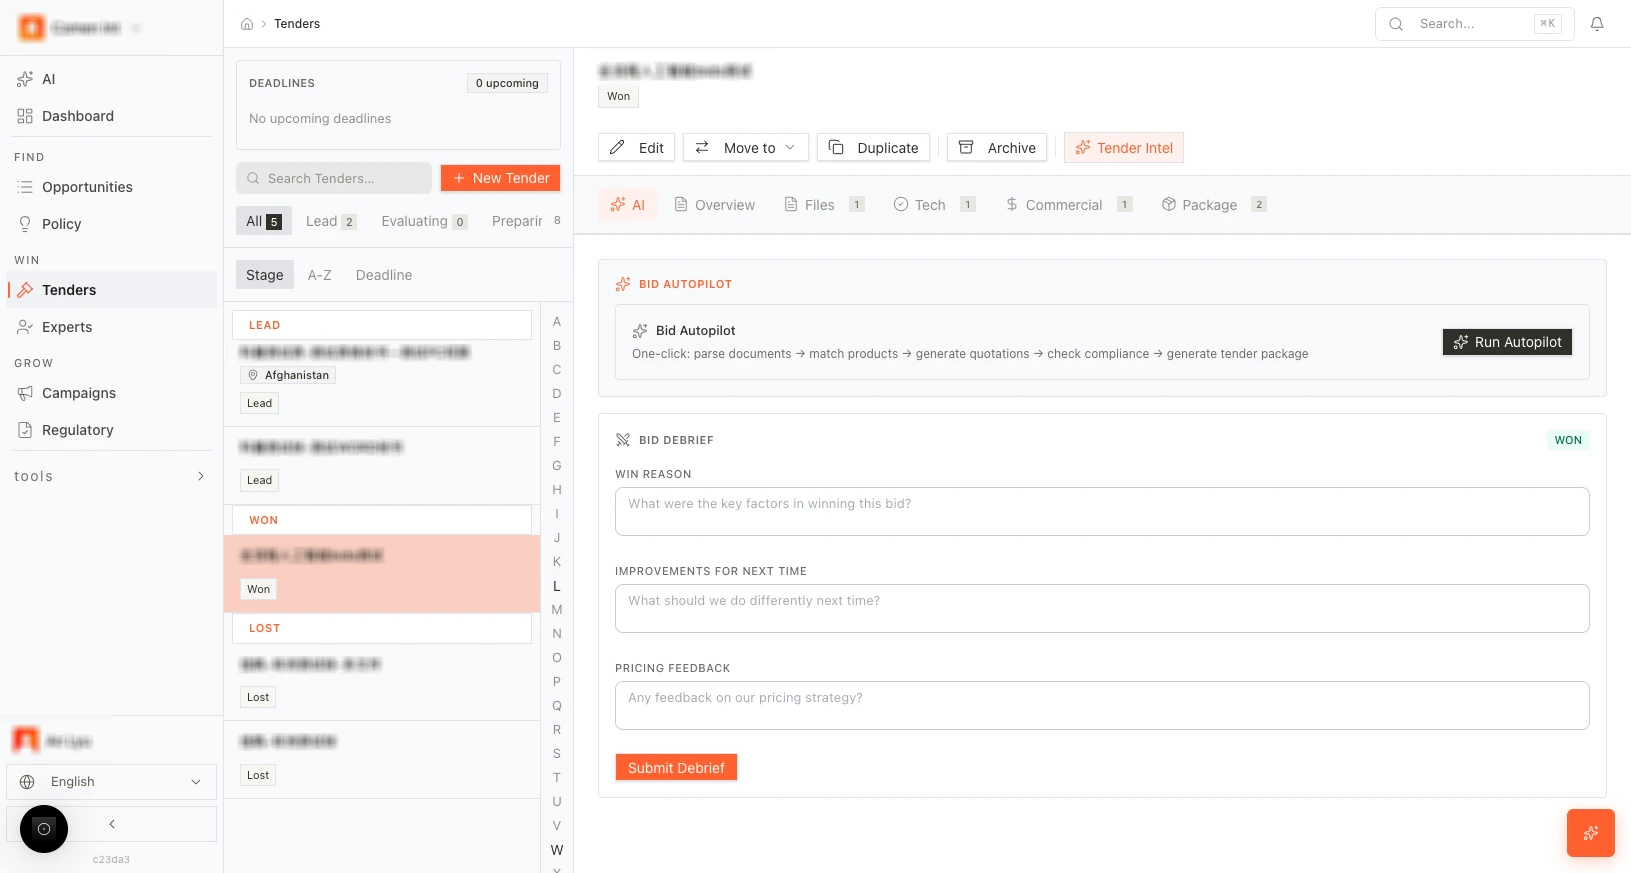
Bid Debrief (Won)
When you move a tender to Won, the Bid Debrief section appears (e.g. under the AI tab for that tender). Fill in the following so the system can learn what led to success:- Win Reason — “What were the key factors in winning this bid?” Describe differentiators, relationship, pricing, or technical strengths that contributed to the win.
- Improvements for Next Time — “What should we do differently next time?” Optional; use for process or content improvements.
- Pricing Feedback — “Any feedback on our pricing strategy?” Optional; use if the client gave feedback on pricing.
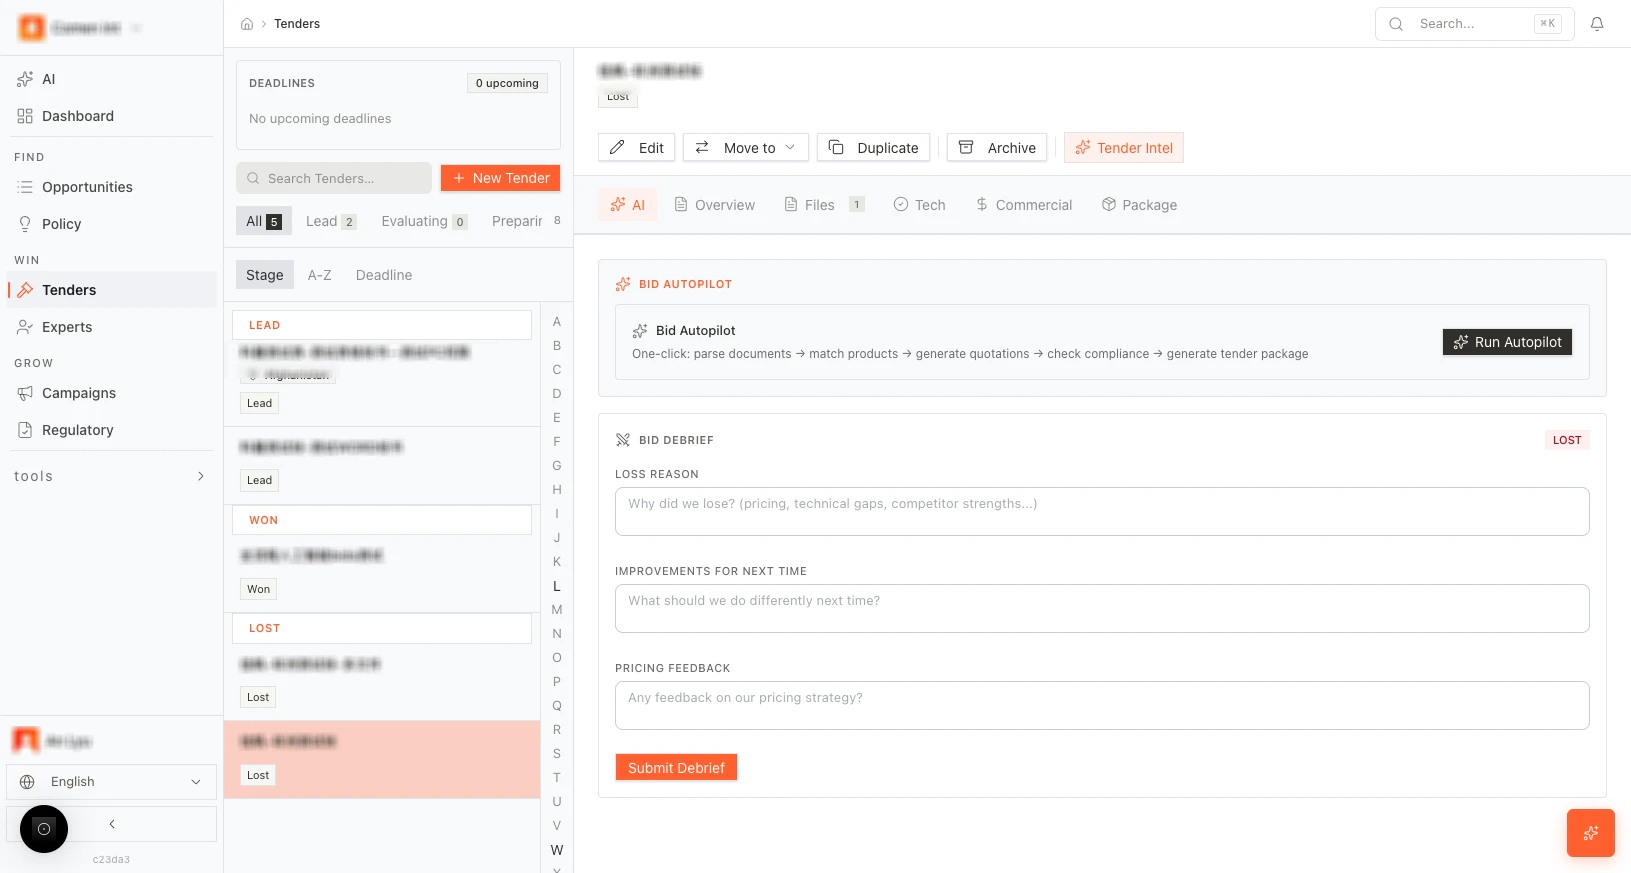
Bid Debrief (Lost)
When you move a tender to Lost, the Bid Debrief section appears with:- Loss Reason — Required. Explain why you lost (e.g. pricing, technical gaps, competitor strengths, timing). This is the most important field for learning.
- Improvements for Next Time — Optional. What to do differently next time.
- Pricing Feedback — Optional. Any feedback on pricing.
Step-by-step: Mark outcome and complete Bid Debrief
- Open Tenders and select the tender that has been decided (won or lost).
- Click Move to and choose Won or Lost. The list and Dashboard funnel update.
- Open the AI tab (or the tab where Bid Debrief appears). The Bid Debrief section is shown.
- If Won: Fill Win Reason (what led to the win). Optionally fill Improvements for Next Time and Pricing Feedback. Click Submit Debrief.
- If Lost: Fill Loss Reason (required). Optionally fill Improvements for Next Time and Pricing Feedback. Click Submit Debrief.
- The data is saved and used for future opportunity scoring and bid recommendations.
Appendix
Navigation and global tools
- Sidebar: AI, Dashboard, Opportunities, Policy, Tenders, Experts, Campaigns, Regulatory, and under Tools: Events, Press, Products, Institutions, Settings. Click any item to go to that section.
- Global search and notifications are in the header. Use search to find tenders, opportunities, and other data quickly (e.g. by name or reference).
- Language can be changed in the footer of the sidebar (e.g. English). Keyboard shortcuts may be available (e.g. ? for shortcuts). Check the app footer or help for the full list.
Prerequisites for AI features
Many AI features (e.g. Analyze on opportunities, AI Signal Analysis on policy, Tender Intel, pricing insights, Bid Autopilot) work best when:- Your Company profile is set in Settings.
- Your Products are added and maintained.
Quick links
| Area | Link |
|---|---|
| Dashboard | https://app.medstrato.com/dashboard |
| Opportunities | https://app.medstrato.com/opportunities?view=list |
| Policy | https://app.medstrato.com/policy |
| Tenders | https://app.medstrato.com/tenders |
| Experts | https://app.medstrato.com/experts |
| New Tender | https://app.medstrato.com/bids/new |
| Settings | https://app.medstrato.com/settings |
Screenshot index
This index maps all 47 reference screenshots (from the source folder MS使用手册及培训) to the sections of this document. Every image is embedded in the manual and stored underimages/user-manual/ (see images/user-manual/README.md for the full manifest).
| Folder | Screenshot / topic | Document section |
|---|---|---|
| 2-DASHBOARD | Dashboard overview (KPIs, funnel, filters) | Chapter 1: Dashboard |
| 2-DASHBOARD | Top filters (time, date range, Region/Country open) | Dashboard controls and filters |
| 3-OPPO (Opportunities) | 01-a1: Opportunities list (Live, count, columns, ACTIONS) | List view — header and data status, List view — tabs and table |
| 3-OPPO | 01-a2: List with filters applied | List view — tabs and table |
| 3-OPPO | 01-b1, 01-b2: Opportunity detail panel (Create Bid, Analyze, sections) | Opportunity detail panel |
| 3-OPPO | 02: Map (orange points, blue areas, controls, Top Recipients) | Map view |
| 3-OPPO | 03: Analytics funnel | Analytics view |
| 3-OPPO | 04: Decisions (Recommend/Watch/Not recommended, score bands, formula) | Decisions view |
| 4-POLICY | Policy overview (Global Policy Signals list and map) | Chapter 3: Policy, Global Policy Signals |
| 4-POLICY | Signal detail panel (Ask AI, Deep Analyze, Create Alert, View Original) | Signal detail panel |
| 4-POLICY | Investigations tab | Investigations tab |
| 5-1-TENDERS | Tender list, stage tabs, Deadlines, New Tender | Tender list — header and navigation |
| 5-1-TENDERS | Per-tender actions (Edit, Move to, Duplicate, Archive, Tender Intel) | Tender list — per-tender actions and tabs |
| 5-1-TENDERS | Bid Autopilot / Run Autopilot | Bid Autopilot |
| 5-1-TENDERS | New Tender form (all fields) | Creating a new tender — form fields |
| 5-1-TENDERS | Upload and parse (AI parse, categories, parameters, Matched %) | Documents and parse |
| 5-1-TENDERS | Technical editor (products, Match Products, compliance, Tender Intel, WIN assessment, generate text) | Technical editor (Tech tab) |
| 5-1-TENDERS | Commercial editor (quotation table, margin, suggestions) | Commercial (quotation) editor |
| 5-1-TENDERS | Tender Package (sections, Generate all, AI edit: Shorter/Longer/Professional/Rephrase, Export, Finalize) | Tender Package (proposal document) |
| 5-2-TENDERS (Post-bid) | Stage (Move to: Won, Lost, etc.) | Stage management (Move to) |
| 5-2-TENDERS | Bid Debrief — Won (Win Reason, Improvements, Pricing Feedback, Submit Debrief) | Bid Debrief (Won) |
| 5-2-TENDERS | Bid Debrief — Lost (Loss Reason, Improvements, Pricing Feedback, Submit Debrief) | Bid Debrief (Lost) |